“How to make roses from old book pages” – Has this question struck you as a beginner ? If yes, you’ve come to the right blog. Making paper flowers out of old used paper is so easy that even children can learn to make it.
As somebody who has been making roses from old book pages from the past many years, I can tell you that most beginners start paper crafts by using old book pages or newspapers or even magazines.
In fact, they come out looking really vintage as opposed to appearing ordinary or cheap. In my current blog, I’d like to help you learn the easy craft of making these in the most simplest way.
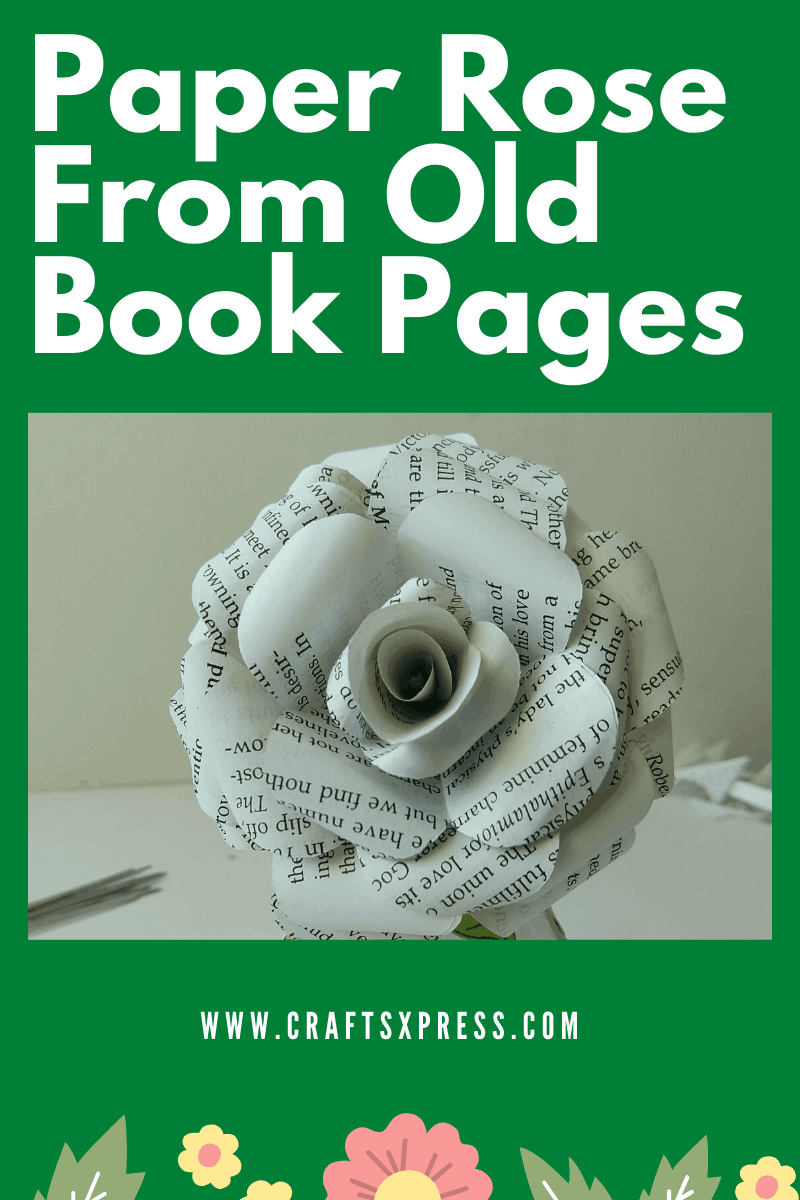
How to Make Roses from Old Book Pages ?
Paper roses from old book pages can be used for making a beautiful bouquet, a wreath and also for decorating a gift pack with antique look.
Making paper roses from old book pages is a good idea when you’d like to try some paper craft instantly but can not go for purchasing material.
Before I start helping you with the exact steps to make paper roses from old book pages, let me share the list of supplies needed.
I have created a video on the same. And I am sure, you will love watching it.
Essential Materials Required for Making Paper Roses
Making paper roses from old book pages is quite simple. Most of the material required for this craft is easily available at home. Take any old book which you are not going to use anymore.
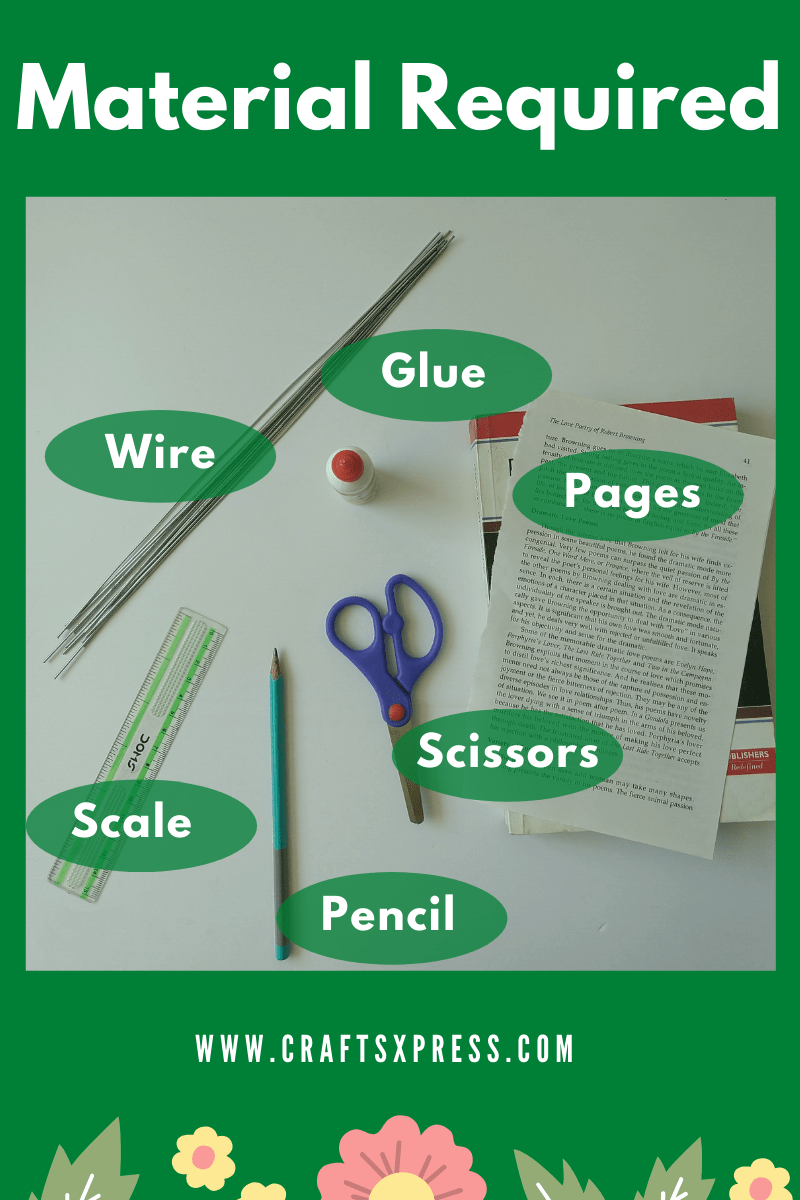
The following supplies are needed for making paper roses out of old book pages.
| Old Book Pages
Any old book which you are not going to use anymore. |
| Wire
Wire will be needed for making a stem. You can use a tube. |
| Scissors
Use medium size scissors. |
| Glue
Use any good quality glue. |
| Pencil
You will need a pencil for marking on paper. |
| Scale
Needed for measurement. |
13 Main Steps to Make Paper Roses From Old Book Pages
Let us begin to learn to make a paper rose from old book pages.
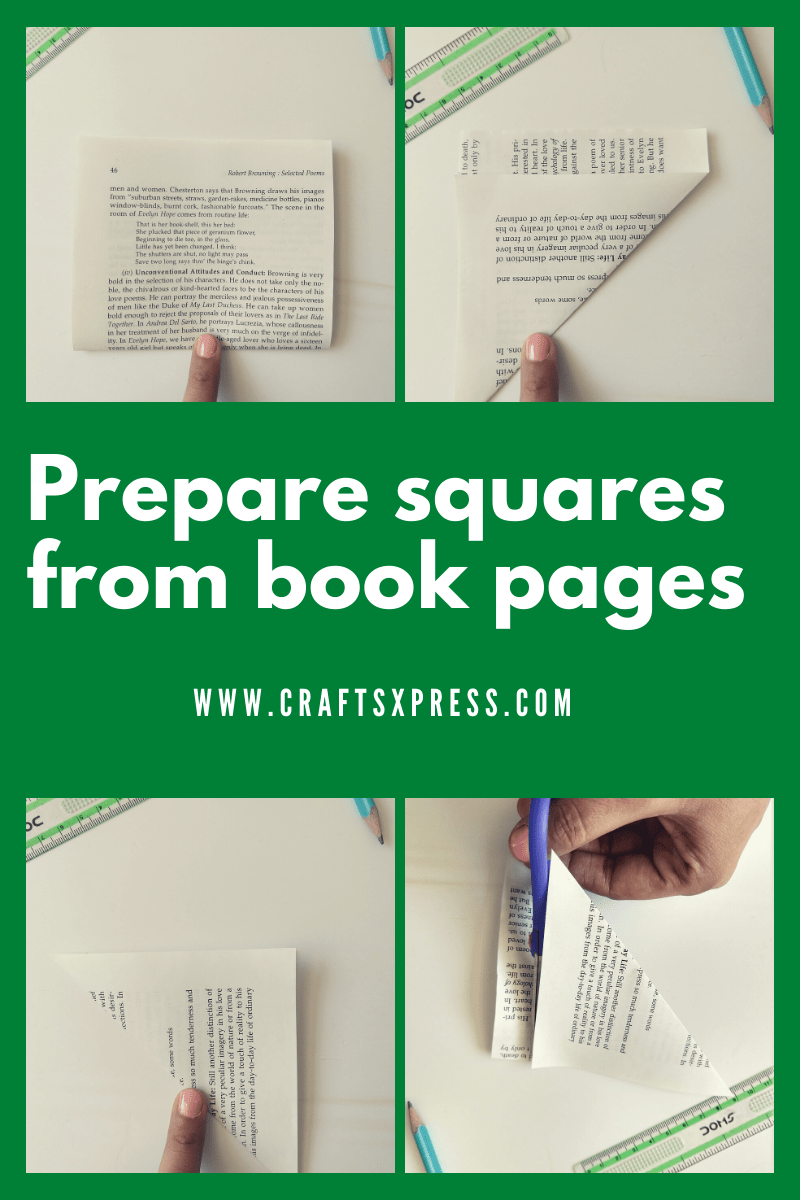
Step 1: Preparing squares from old book pages
For this , you need 3-4 pages of any old book.
Tear Some Pages From Old Book
Take a book and tear 3-4 pages from it. Ensure that the pages contain texted part rather than graphics. Reason being, this will provide a vintage look.
Mark 11 cm Width On Paper
Measure 11 cm width with the help of scale and mark it with the pencil. After that fold it diagonally. It will look like a triangle shape now.
Cut Out Extra Piece
After folding, now cut all extra pieces of paper out of it. By doing so, you’ll get a square with length and width equal to 11 cm. You will need a total of 4 square pieces like this.
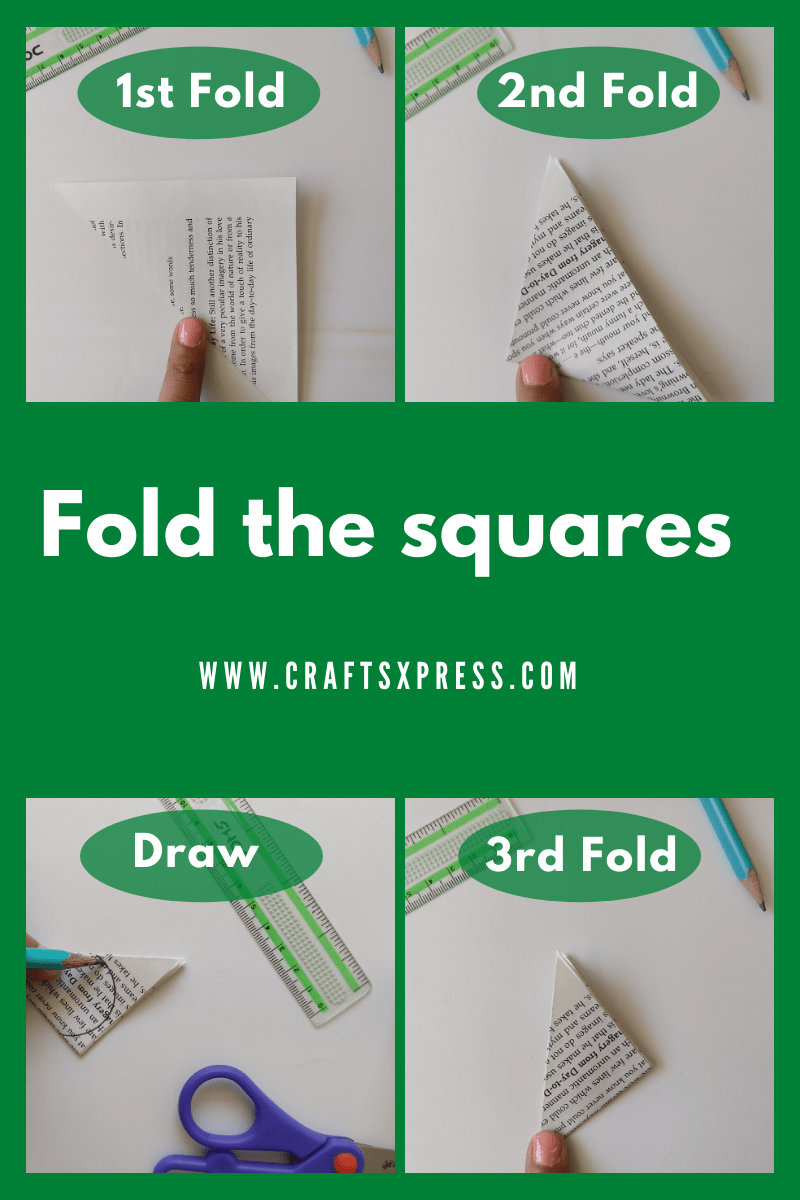
Step 2: Folding the squares from old book pages
Now that you have 4 square pieces, you will making petals for your rose out of these squares. You are expected to fold them now.
Fold The Square Pieces
First of all, make a single fold on one square piece diagonally. It will appear like a triangle.
Secondly, make another fold through the middle of that triangle piece of paper. Again you will get a triangle shape. But this time it will be smaller than the previous one.
Finally follow the previous step again. Now you will get the desired result.
Draw A Curve
After performing 3 folds on your square, mark a curve line on your triangular shaped paper. Mark the curve line along with open ends of your smallest triangular shape paper.
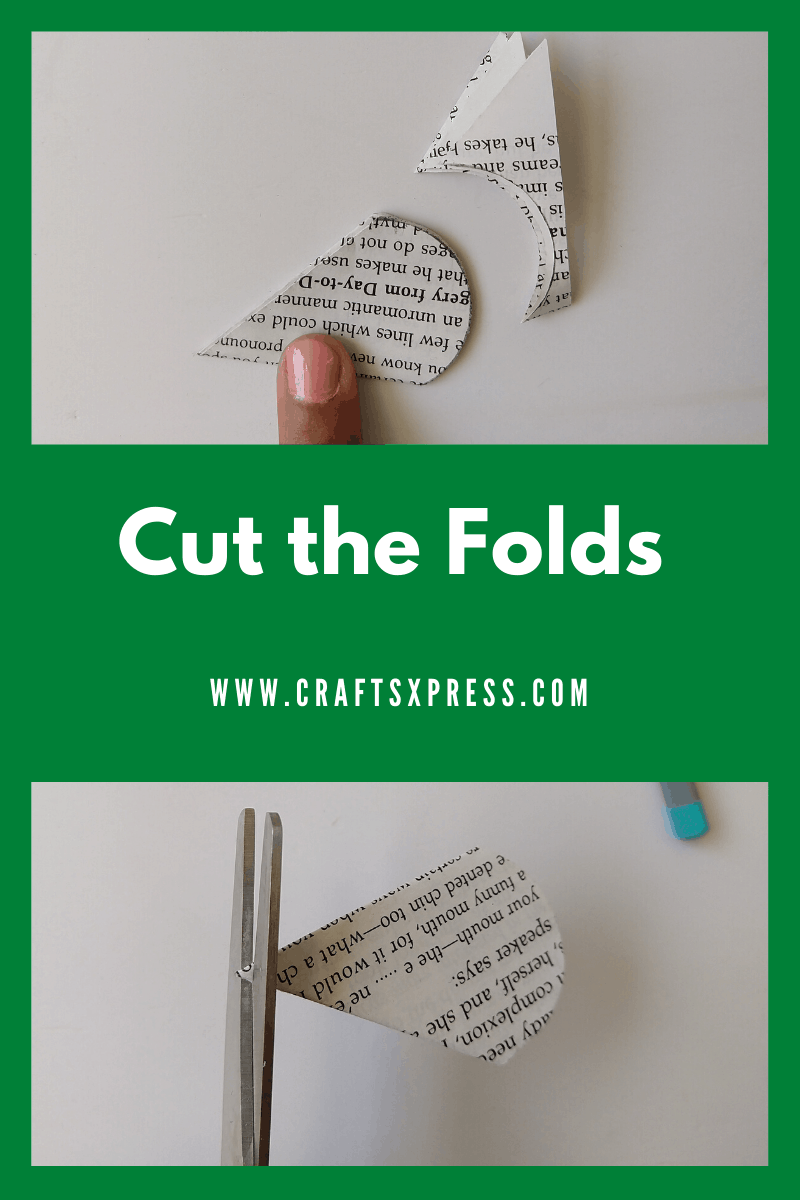
Step 3: Cutting the folds out of old book paper
After marking curve line, it’s time to cut it. While cutting be careful as there are 3 folds on the paper. And you are supposed to cut all these folds at once.
Cut Along With Curve
Make a cut along the curve marked previously. Scissors which you are going to use should be sharp enough otherwise edges of your petals will look rough.
Cut A Small Hole
After cutting out the petal, make a small cut on the tip of the petal. You need to make a hole in it. Reason being, the over all arrangement of the rose will become easy.
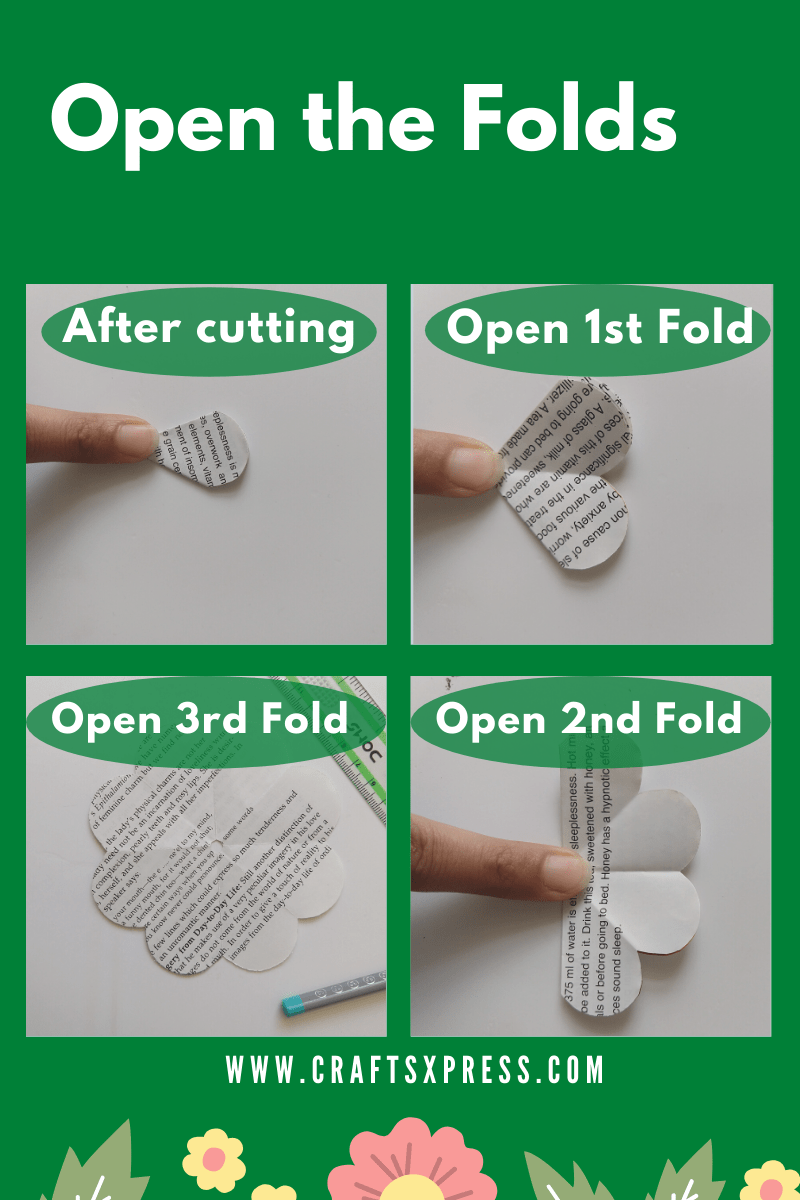
Step 4: Opening the folds to make petals
You will get your first petal after unfolding the pieces of paper that you had folded before. And .so its time to proceed ahead.
After Cutting and opening all folds
Now unfold all the previously made folds one by one. After opening the first fold, your petal will look like a heart. And with opening of the second fold, petal will look like a cloud. At last, with final unfold it looks like a collection of petals.
After cutting, and opening all folds, your petals will look the same as shown in picture below.
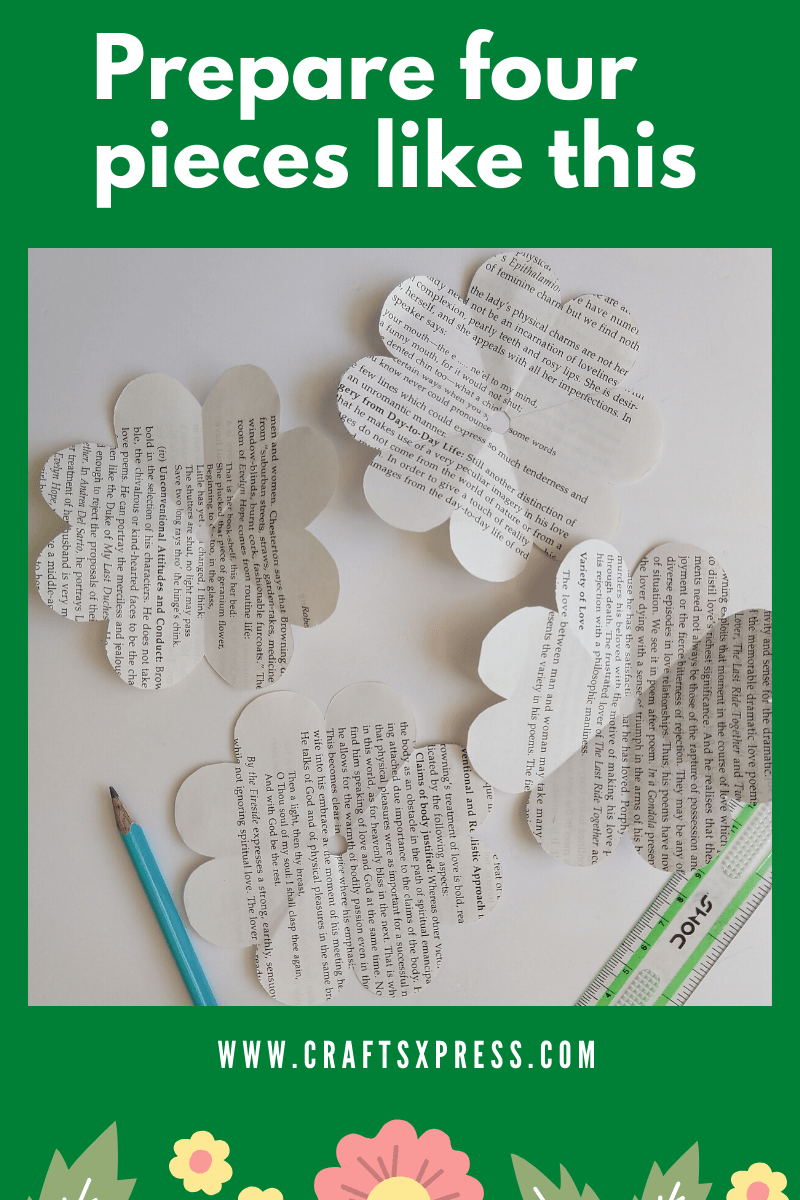
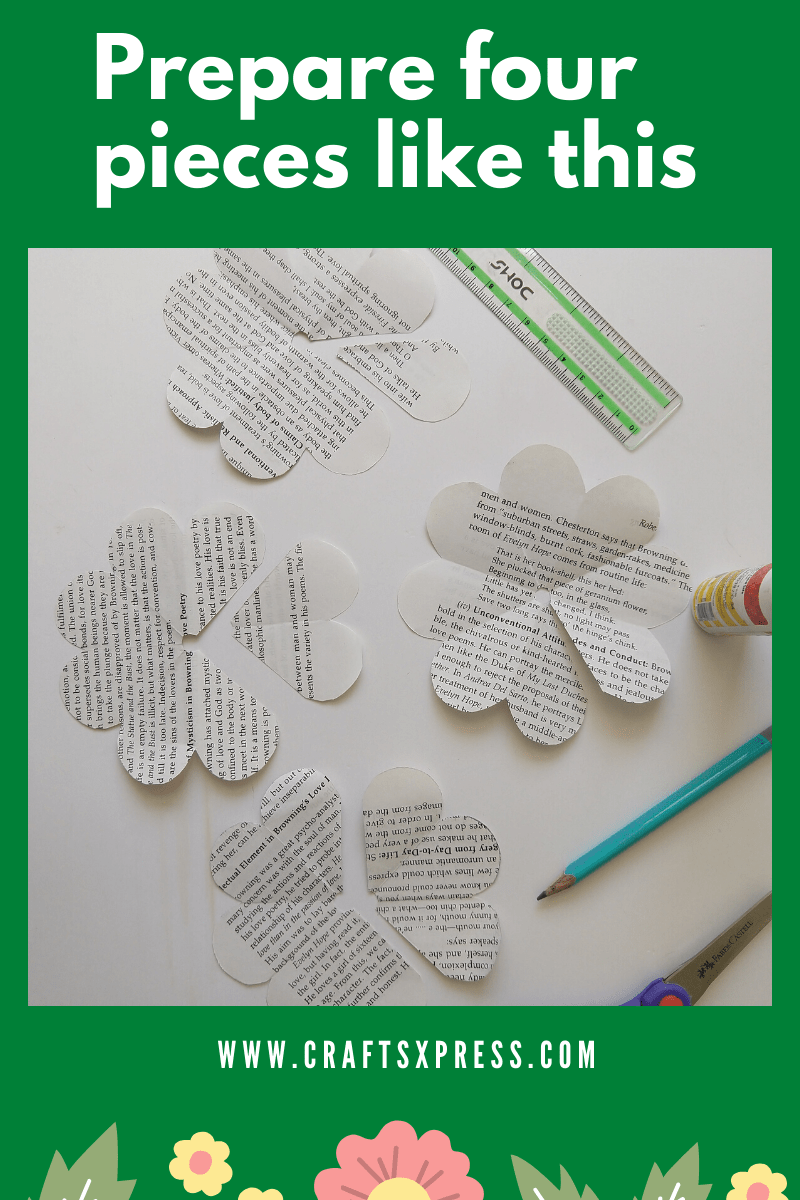
Step 5: Preparing four pieces
One by one, prepare all the remaining three squares on a table. While preparing other three squares, mark the curve line on them in this manner that all the petals should be of same size.
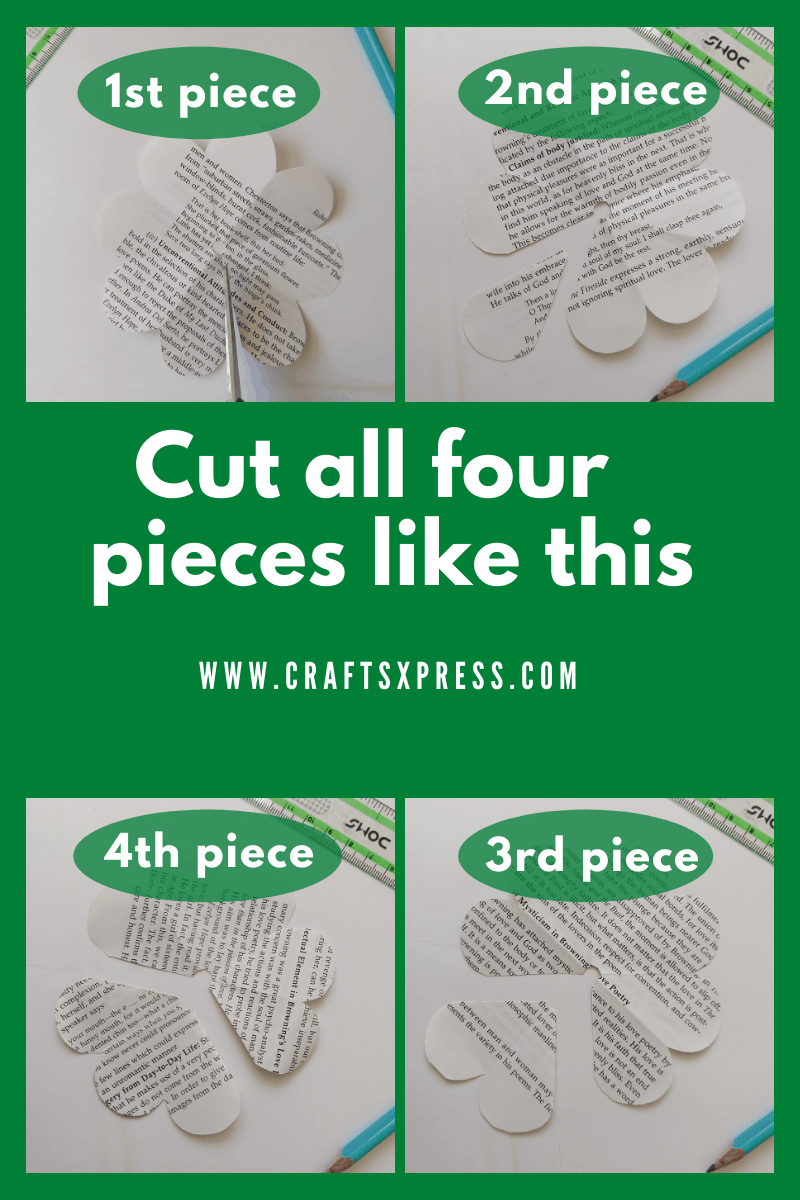
Step 6: Cutting all four pieces
You need to cut the four pieces one by one. There will be a certain variation in cutting of each piece.
Make A Cut
First of all take one piece out of four. Make a cut though one segment. Nothing more is to be done with this piece.
Cut one Segment
Again pick up another piece of square. Cut out one segment from it.
Cut second Segment
From third piece, cut two segments. Do not throw these cut out pieces. You will need them later.
Cut third Segment
Lastly, cut out three segments out of fourth piece. Previously you have a total four pieces. And now you have total 7 pieces after cutting.
Step 7: Keeping all the four cut pieces together
Put all the four pieces cut out together to be able to proceed to the next step.
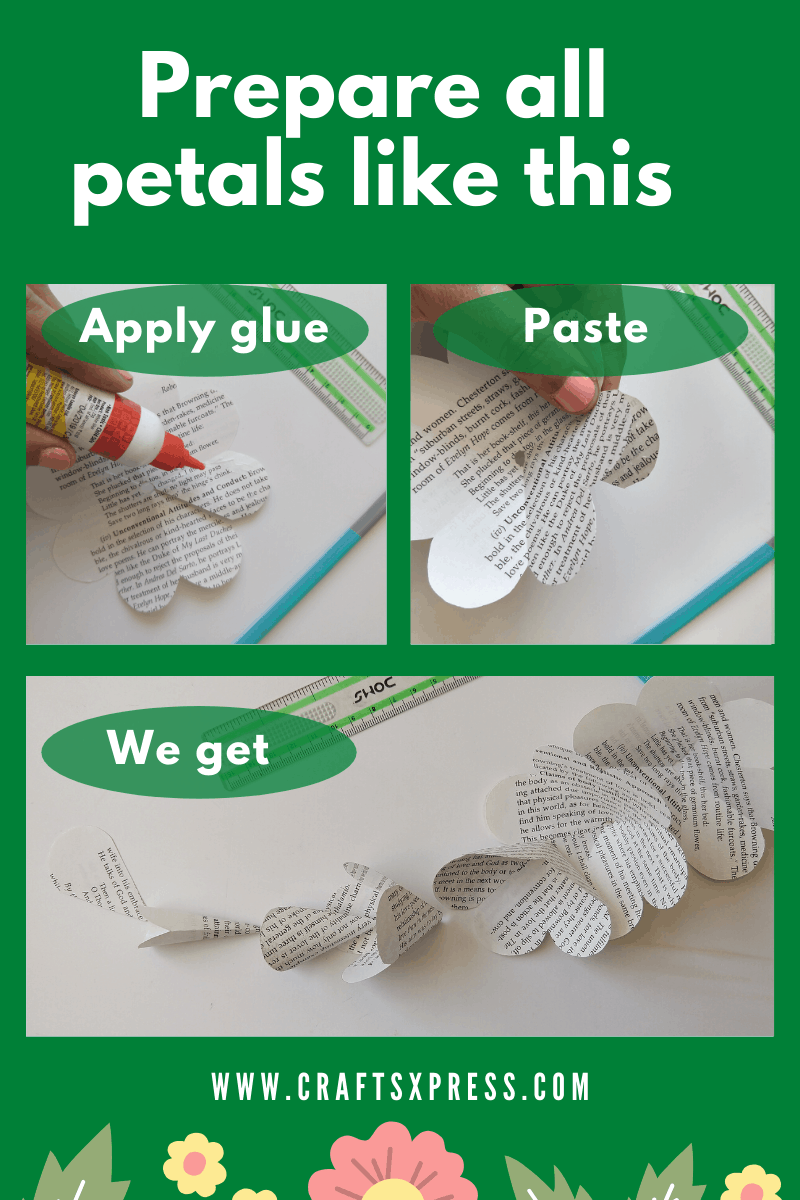
Step 8: Pasting the petals
In this step you are supposed to paste the pieces one by one. And this way, you will be able to make the petals for your rose. You can either use glue or an automated tool for glue.
Apply Glue On First Segment
First of all apply some glue on the very first segment of the piece. There are two end points to it. So you have to apply glue to any one of the end points.
Paste With Last Segment
Furthermore, paste another segment (another end point) on it. Same like you are overlapping one end point with another one. Hold it for few seconds. Now leave it for dry and work on another pieces.
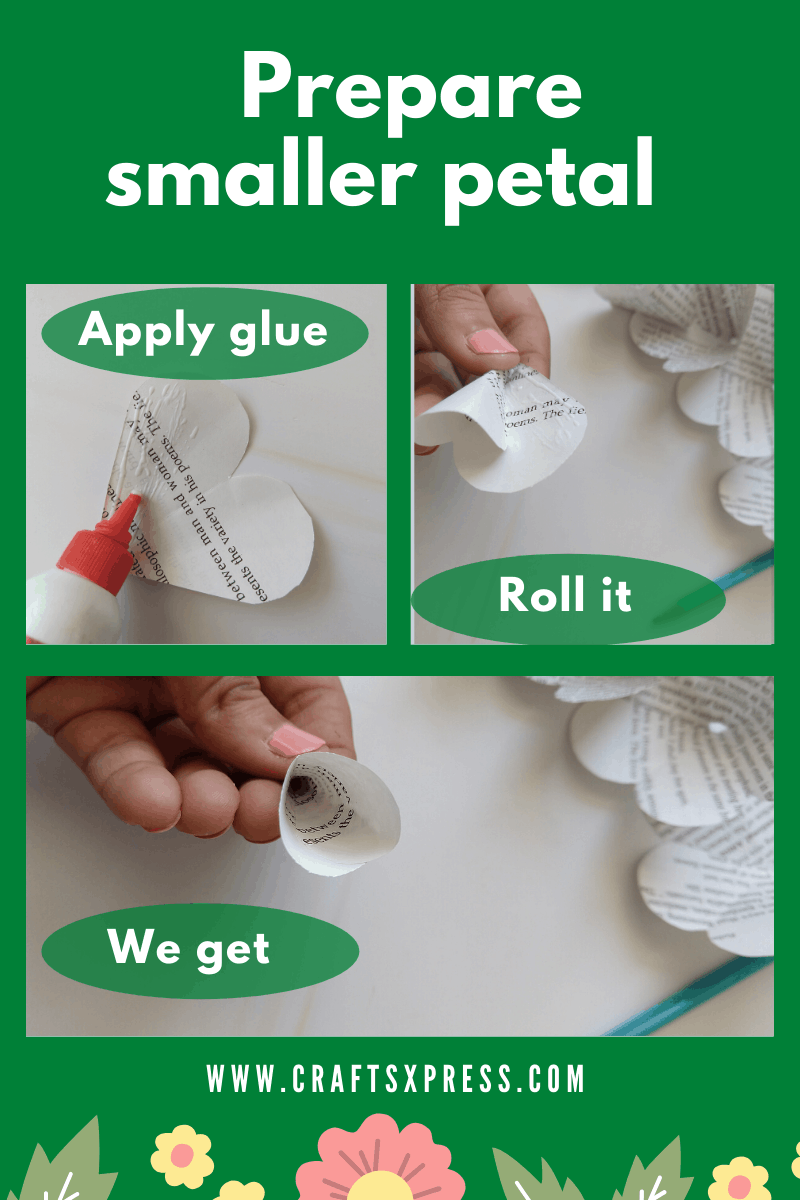
Step 9: Preparing the smaller petal
Now it is time to paste your two segmented petal. It is a smaller petal as compare to rest of the petals you’ve made till now.
Working with Two Segment Cut Out
Apply some glue to the half segment of the two segmented petal. Furthermore, roll it and place half portion of another segment. Hold it for few seconds. Now let it dry.
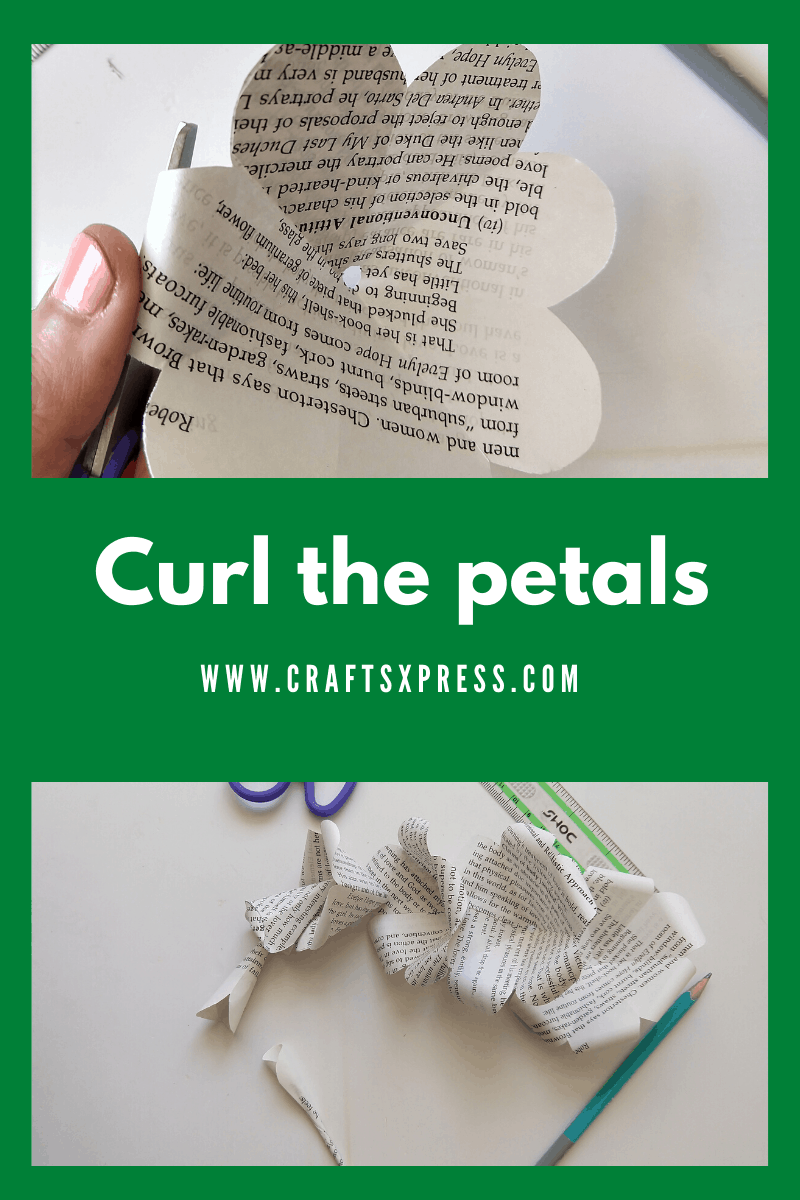
Step 9: Curl the petals
Up till this moment, you must have a total of 6 petals except for one segmented one piece. This piece is to be tucked in a stem.
So just put it aside and work on these six petals.
Now give your petals effects that make them look real.. For this we just need a pair of scissors or a pencil. With the help of any one of them make some curls to our petals.
Make Some Curling Effect On Petals
Since I used scissors while making, I’ll be explaining with the same.
Place scissors under one segment and your thumb over it. Now while slipping the paper through scissors and thumb, stretch it. Or you can roll the segment in outward direction with the help of pencil. After that petals look like real one.
Perform same methods one by one with all the six petals. See the picture below.
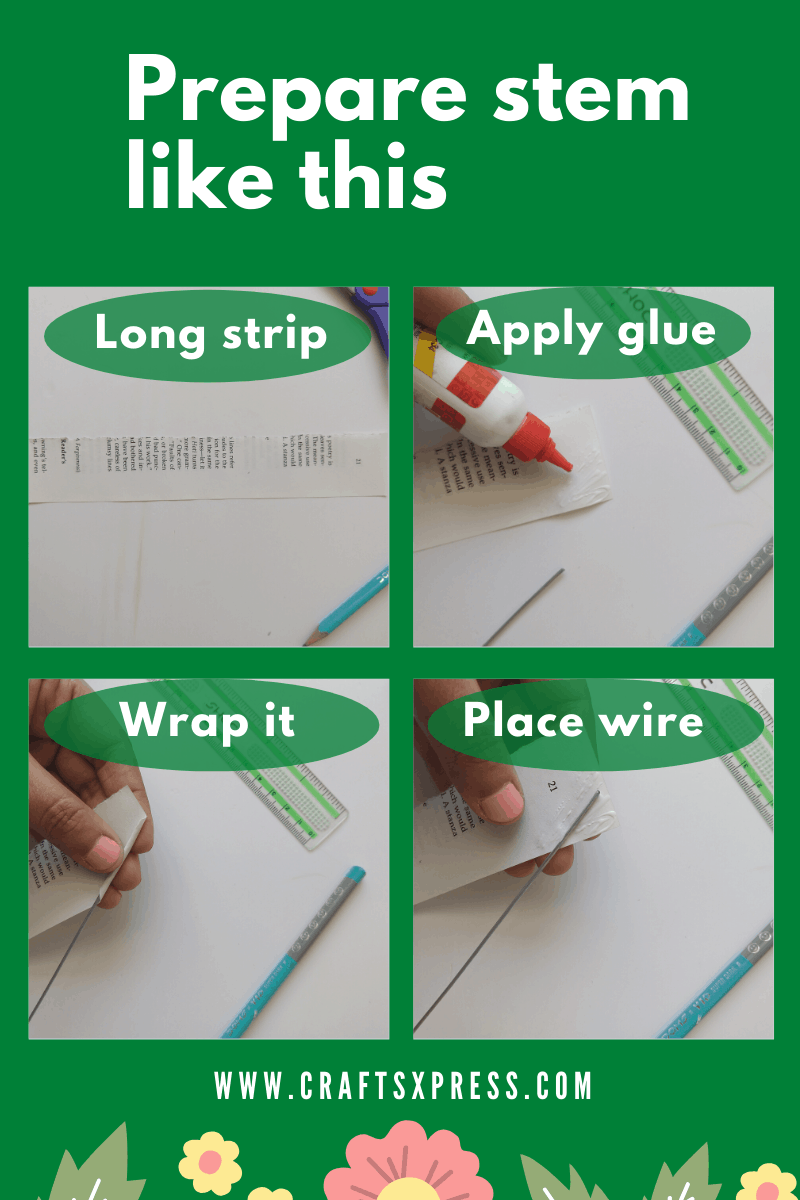
Step 10: Preparing the stem
For preparing stem for your rose, take a long paper strip of paper from an old book.
Take a Long Strip
You can take 3 cm wide and 20 cm long strip. You can vary the length according to the length of the stem. For example if you want longer stem then take long strip and if you want shorter one, take a little shorter strip. But you should not need to vary the width.
Apply Glue
Apply glue on one corner of the paper strip.
Place The Wire
Furthermore, place wire in this corner.
Wrap It
After placing wire on the corner, roll the wire diagonally and wrap paper around the wire. At the ending point again apply some glue on the remaining paper and wrap it around the wire. Hold it for few seconds and leave it to dry.
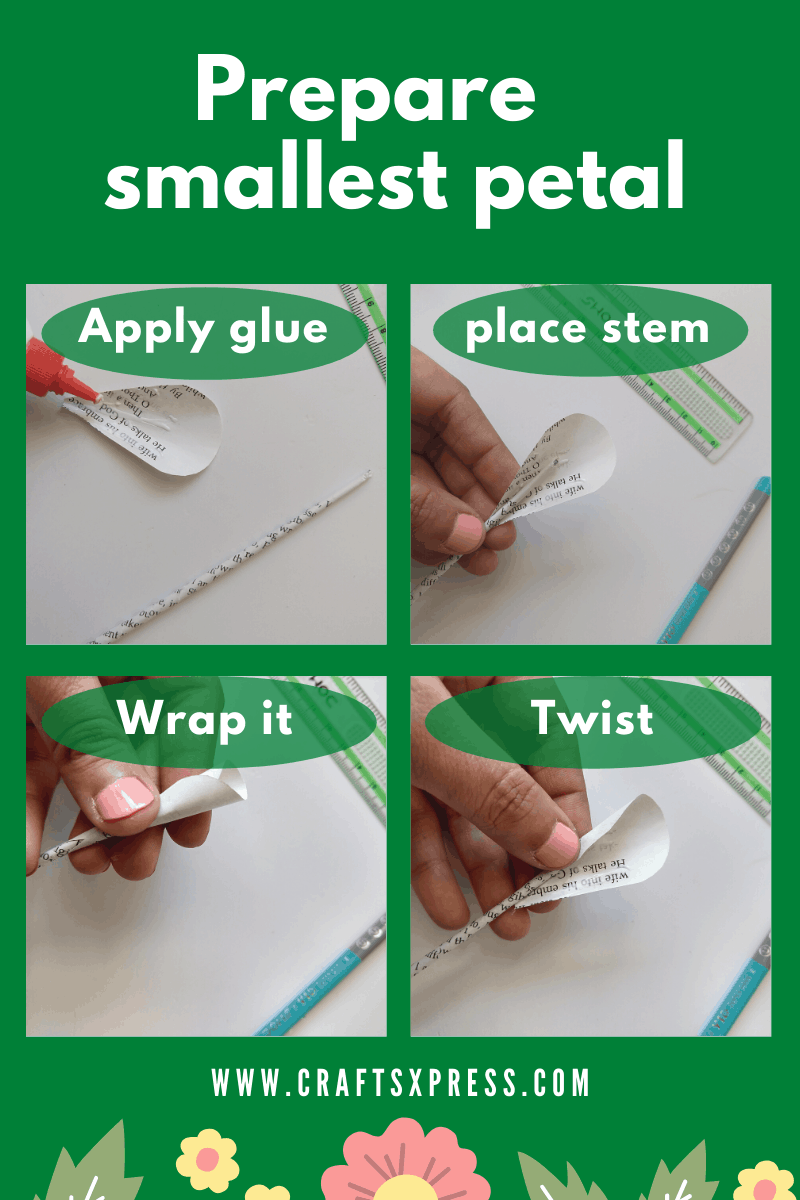
Step 11: Preparing the smallest petal
Finally its time to proceed to the smallest petal.
Apply Glue On Single Petal
First of take one segmented petal. Apply some glue on it. This will be your innermost petal.
Place Stem On It
After applying glue, place your previously prepared stem on it.
Twist The Petal
Now twist your smallest petal a little. For best results, place your stem along with a edge and roll it a little and hold it for few seconds.
Wrap It
After that wrap petal around the stem. Hold it for few second while it is drying. Now you have a long stem along with your smallest petal attached to it.
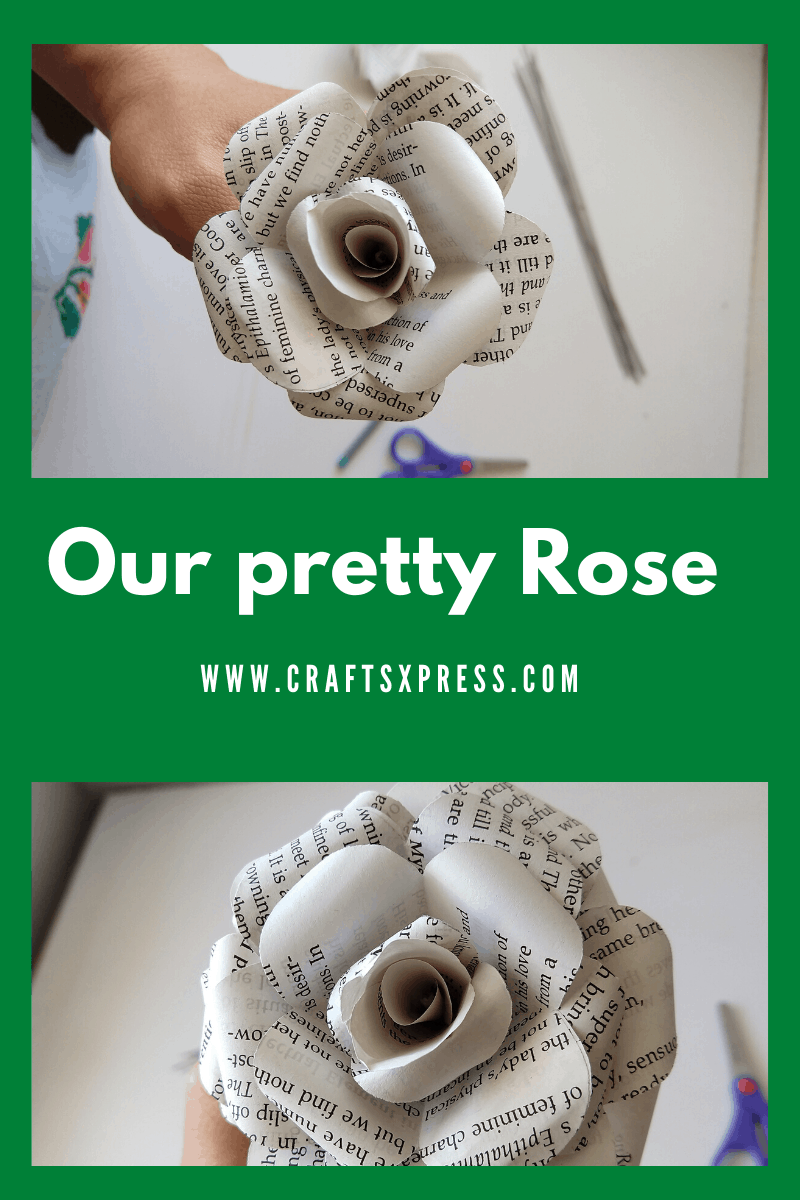
Step 13: Arranging your pretty rose
Finally, you are just few steps away to complete your rose from old book pages. Here is the final attachment of the petals to your stem.
Apply Glue On Smallest Petal
First of all apply some glue on the outer side of the smallest petal which is attached to your stem. After applying glue pick up two segmented petals and tuck them to the stem through a hole in the petal. Wait for few seconds and let them dry.
See the below image as to how to insert stem into petal through tiny hole. If hole on the petals seems a little small you can cut a little more.
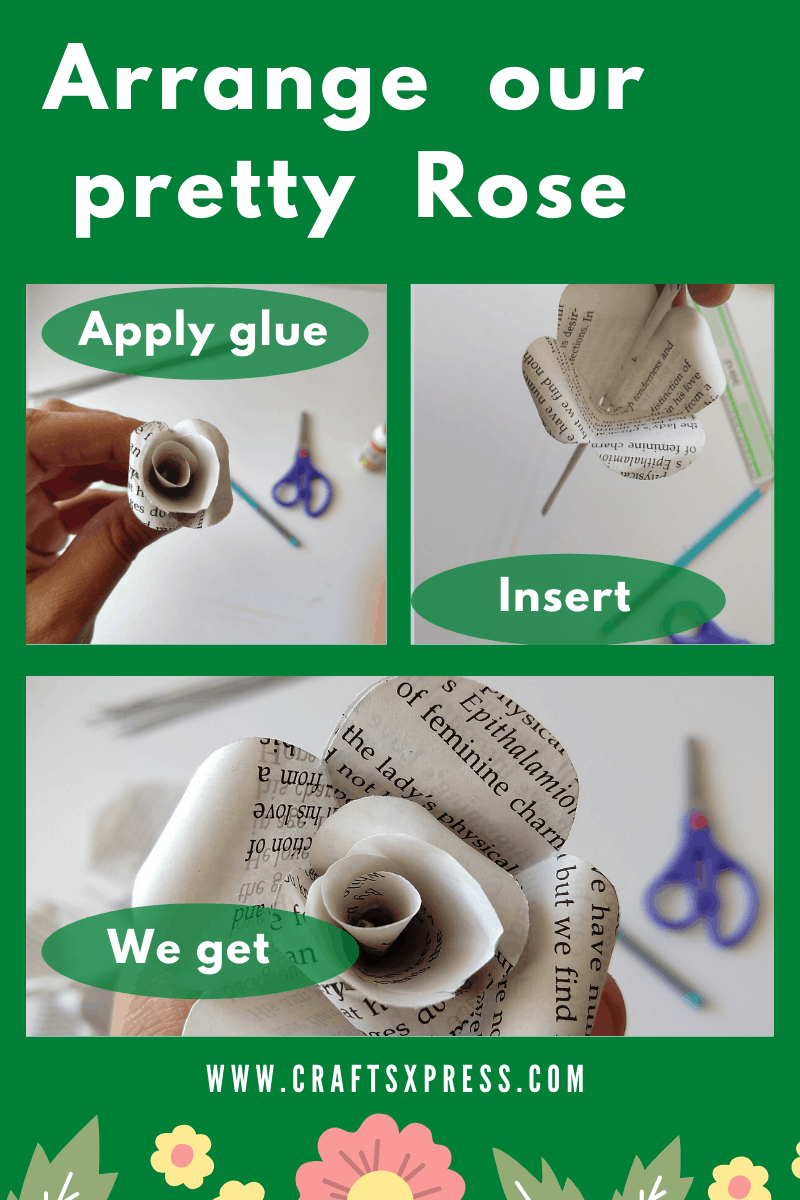
Insert Larger One
After drying, now perform same procedure with rest of the three segmented petals and so on.
Perform this procedure with rest of the petals one by one. Remember, that petals with less number of segments attach first than the petals with greater number of segments.
Paste And Hold
At every point where you attach a new petal to your stem you have to hold it for few seconds so that it can dry and attach nicely to your stem. Follow this instruction at every step where you apply glue.
Why Should Beginners Give Old Book Paper Rose a Try ?
There are certainly many reason to do the same. Firstly, these paper roses need very limited material supply. This material is totally available at home itself.
Secondly, you can practice more and more without thinking about the cost of the material needed. Because primary material is old books pages which you would have discarded anyways.
Lastly and the most importantly, it is simple to make a rose from old book pages once you have a hang of it.
Useful Tips for Making Paper Roses From Old Book Pages
Although making paper roses with old book pages is very easy but by applying the following tips, you can see the difference in your roses when it comes to quality.
| For making a larger flower, just increase the number of petals and size of the squares |
| If you want to make paper roses for decoration purpose and without a stem, then you do not need to make a tiny hole while cutting. |
| Use a hard wire in order to make a decent stem. |
| During the cutting of any kind of paper you definitely want smooth edges. And so, move the paper rather than your hand with scissors. |
| In order to make tiny paper roses, just take square pieces of small size. |
| Try to use raw book pages with text printed on them in contrast to using pages with pictures. |
| If you are a beginner and unable to give curling effect to the petals, do not worry. Just roll the petals slightly backwards. |
| Do not worry if you don’t have any wire at your home for making the stem. Use a long toothpick instead. |
| While marking the curve for preparing petals, mark it along with open end and not the close end. So be careful. |
| During pasting one segment with another for preparing petals, completely overlap both segments. It will give neat and clean effect to your rose. |
| While arranging the rose, start with smallest petal. Tuck smallest petal first to the stem and then larger one. And so on and so forth. |
| By applying some water colours at the edges of the petals you can give a appealing effect to your paper rose. |
Other interesting Paper Crafts with Old Book Pages
Other than beautiful paper roses, there are several other crafts which can be made from old book pages. I am providing a list of such crafts below. It’s amazing how paper can be reused in so many ways.
- Pen holder
- Tissue paper holder
- Beads for jewellery making
- Leaves for flower or bouquet
- Photo frame
- Wall hangings
- Basket
I hope you will try out how to make roses from old book pages along with all the other crafts mentioned above. Let me know if you get stuck with anything. Just post your questions in the comments section below.