“How to make giant paper rose” – This question usually comes to mind when you want an affordable yet stunning wall decor or backdrop for your home. Right? After all, Giant roses give a splendid look.
Most people feel that making a giant paper rose at home is tricky. But it isn’t. And I am here to teach you exactly how to make a giant paper rose in a step by step procedure.
A giant paper rose with an attached stem can end up being alluring for a crafts bouquet, baby shower, kids birthday party and what not. So let us get started.

How To Make a Giant Paper Rose Methodically?
In order for you to understand well, I will be sharing with you my step by step method along with pictures. But first let’s quickly run through the material required.
Essential Materials Needed for Creating a Giant Paper Rose
Here is a complete list of material needed for making a Giant Paper rose.
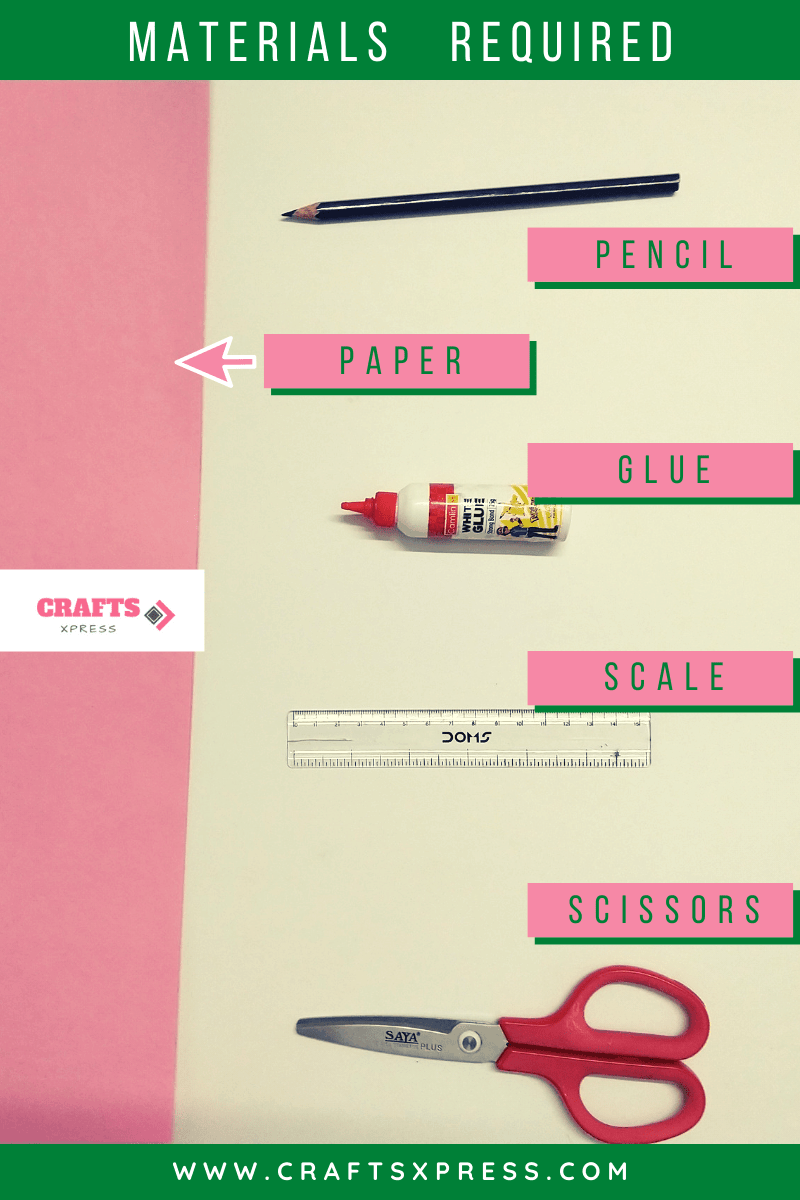
| Chart Paper Sheets
You can take any papers of size ( 70 x 56 cm ) and of 162 GSM (about 60 lbs). I personally used a pink colour paper. Total three such sheets will be sufficient in making a giant rose. |
| Templates
Templates for giant rose petals will be needed. |
| Scissors
Take any medium sized scissors for cutting petals out of chart paper. |
| Glue
Good quality glue will be needed. Or you can use glue tool for quick results. |
| Pencil
A pencil to draw templates for petals will be needed. |
| Scale
For measurement of the templates, you will need a scale. |
How to Make a Giant Paper Rose: The Complete Steps
Making a giant rose, just like a small paper rose from scratch is not so difficult as you might have expected.
| If you are a beginner at making a Giant Paper Rose, I insist that you create your own template for petals of this rose first and then start. If you feel like, you can check out the easy templates that I have created at home.
It needs to be mentioned here that I have used a total of 24 petals for making my Giant Paper Rose – 11 for rose centre (8 extra small petals & 3 small petals ) and 13 (8 medium petals & 5 large petals) for the rose base. |
Let us now learn to make a giant paper rose in a step by step way.
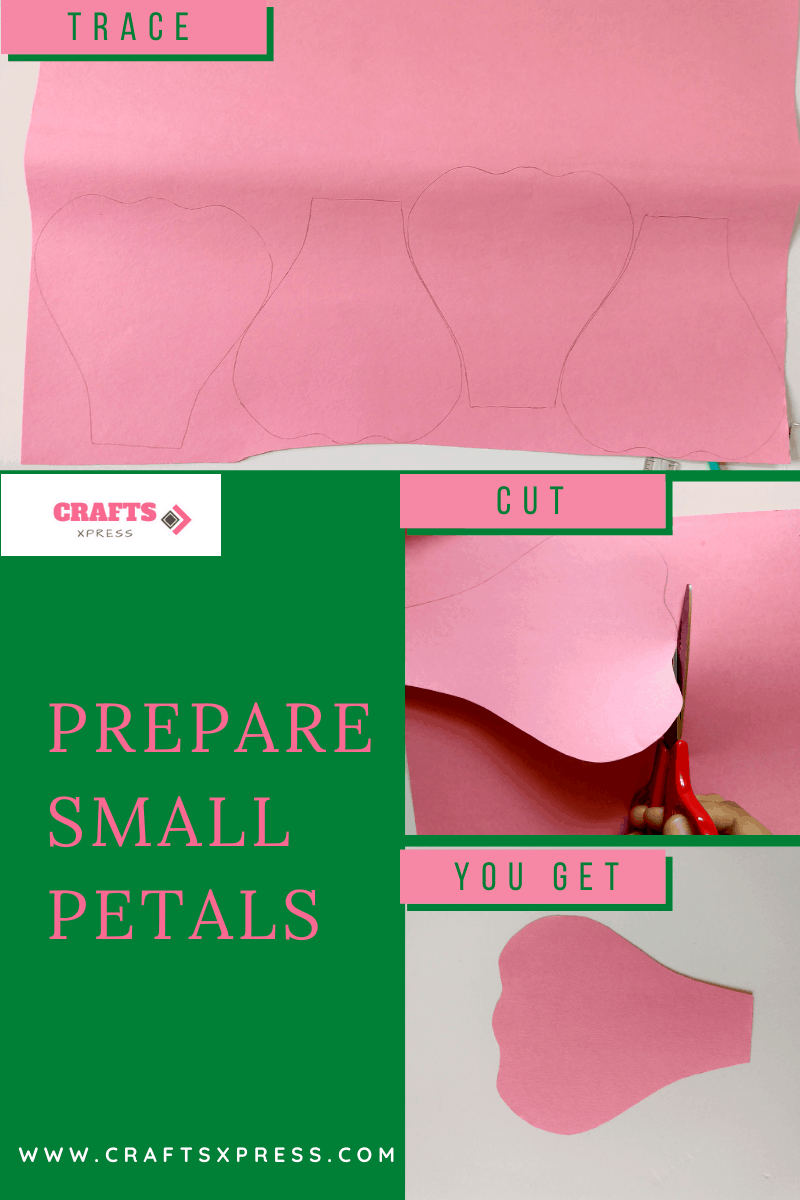
Step 1: Start by preparing eight extra small petals with the help of template
Take the smallest template. After that place the template on chart paper and trace its boundary. Trace 7 more petals because you need total 8 small sized petals. Cut all these 8 smallest petals.

Step 2: Now prepare three small petals with the help of a different template
Take small sized template and trace 3 petals with the help of this template. Cut all these 3 small petals.
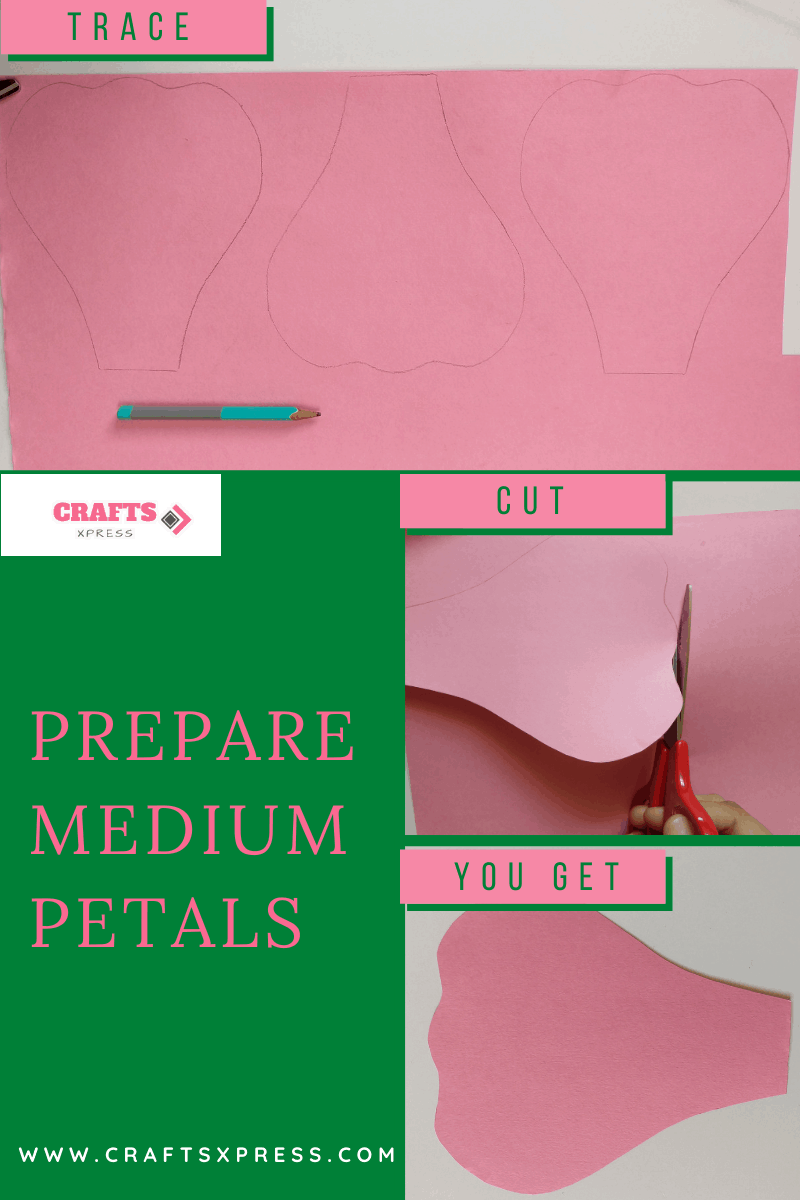
Step 3: Now prepare eight medium petals with the help of a template
Now pick up the medium sized template and with the help of this template, trace 8 petals.
After tracing, cut all the 8 petals.
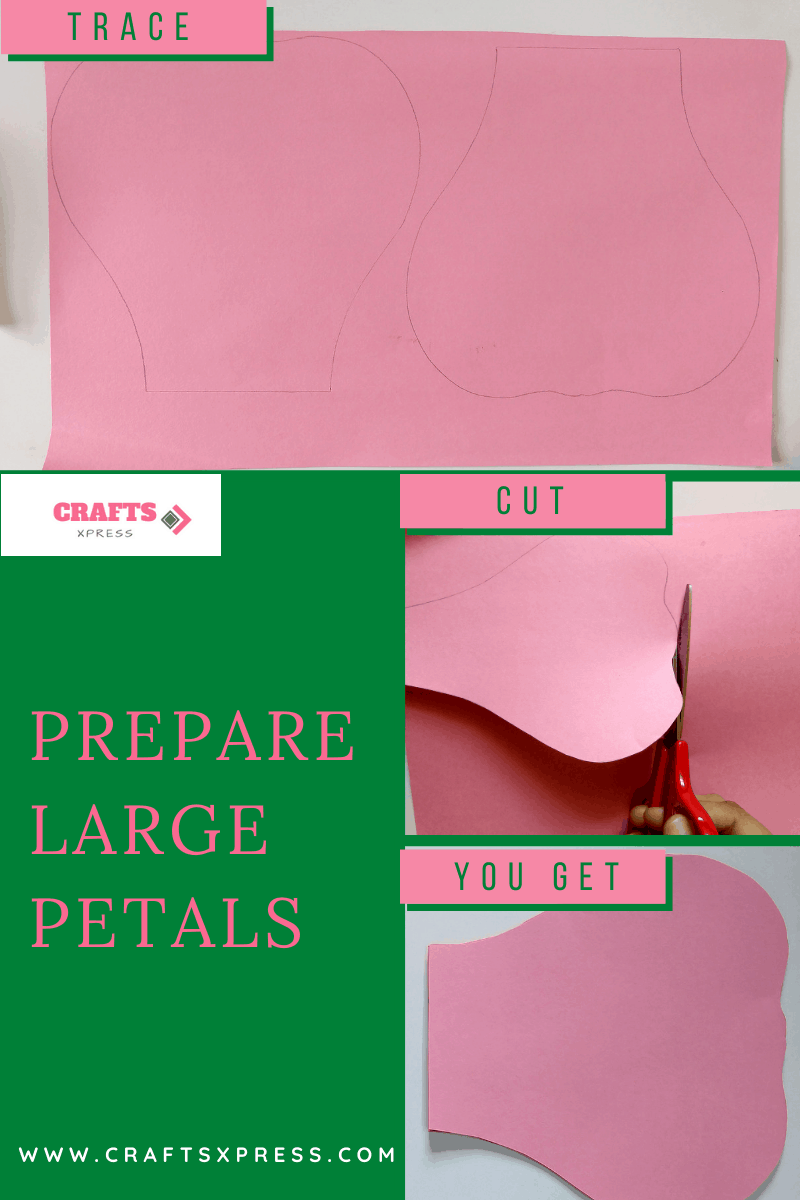
Step 4 : Prepare five large petals with the help of a template
Lastly trace remaining 5 large size petals with large sized template. And cut all of them.
Now you have total 24 petals – 11 for rose centre (8 extra small petals & 3 small petals ) and 13 (8 medium petals & 5 large petals) for the rose base.
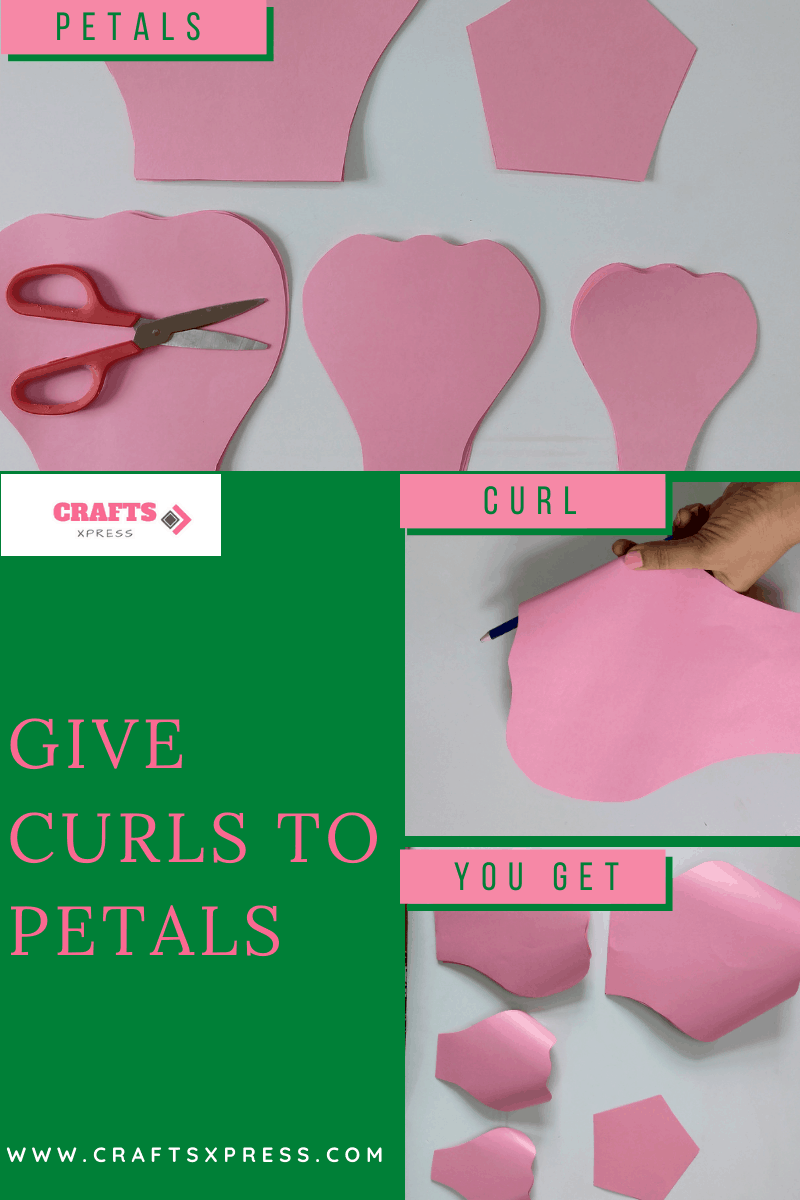
Step 5: Give a curling effect to the petals except the four extra small petals
Now give a curling effect to all the petals except 4 extra small petals.
For this pick up a petal. Hold the petal vertically. Now roll the top of the petal in backward direction with the help of any pencil or any other rolling tool. This will give a nice real looking curl to the petals.
Perform this curling procedure with the rest of the petals.
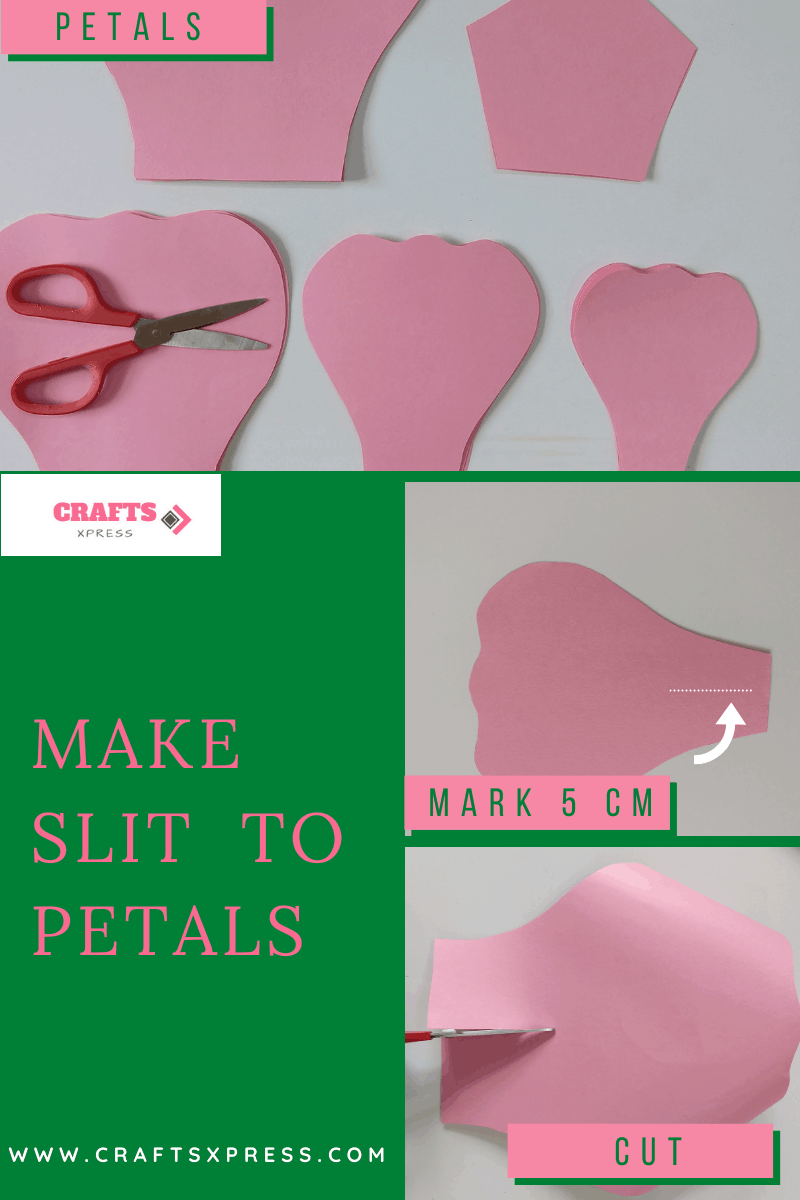
Step 6: Make slits at the base of the petals
Pick up a petal and hold it vertically. Cut it 5 cm vertically with help of scissors. It will create a slit on the base of the petal.
Now you can see two flaps as a result of this slit.
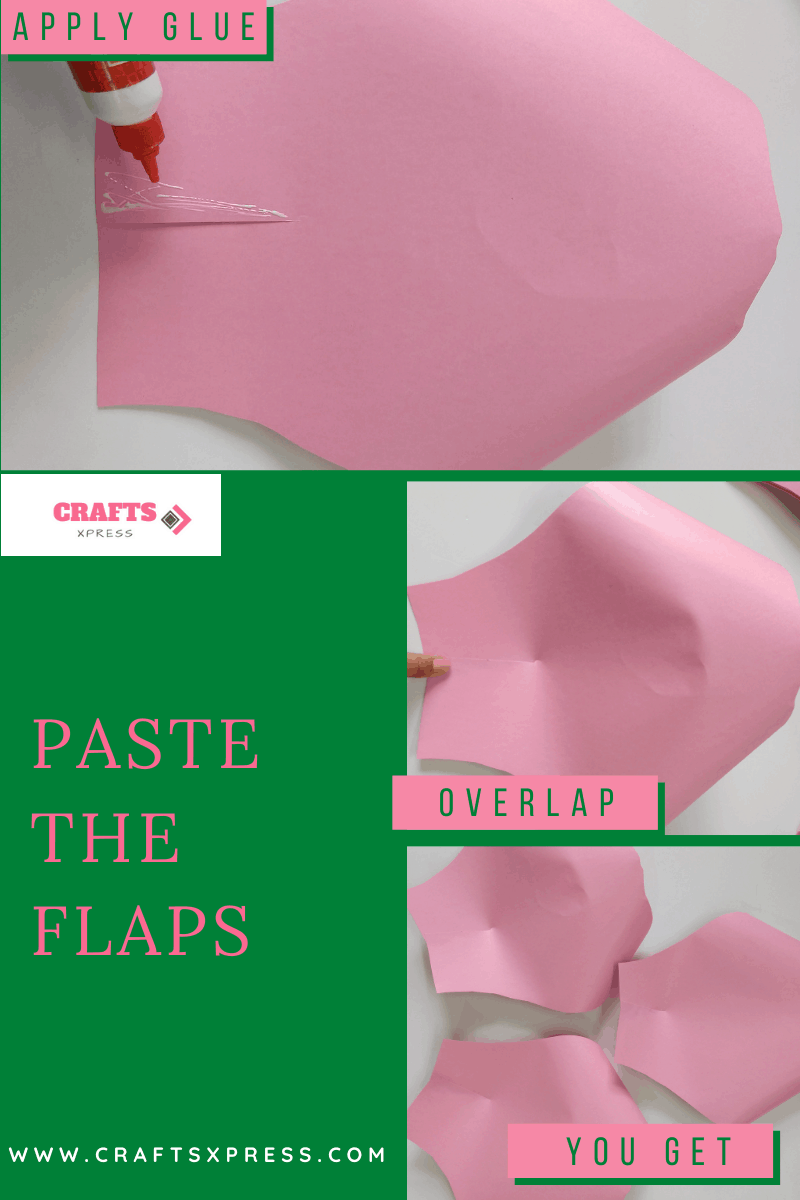
Step 7: Paste the flaps by overlapping
Apply glue on one flap of the petal vertically. Paste another flap of the slit by overlapping. This will give a nice curvy look to your petals rather than a flat one.
For outermost large petals overlapping of these flaps should be very little while pasting. And for medium petals, overlap these flaps a little more and for small one some extra overlapping.
Note: The more you overlap during pasting the more your petal will look uplifted towards the upper side.
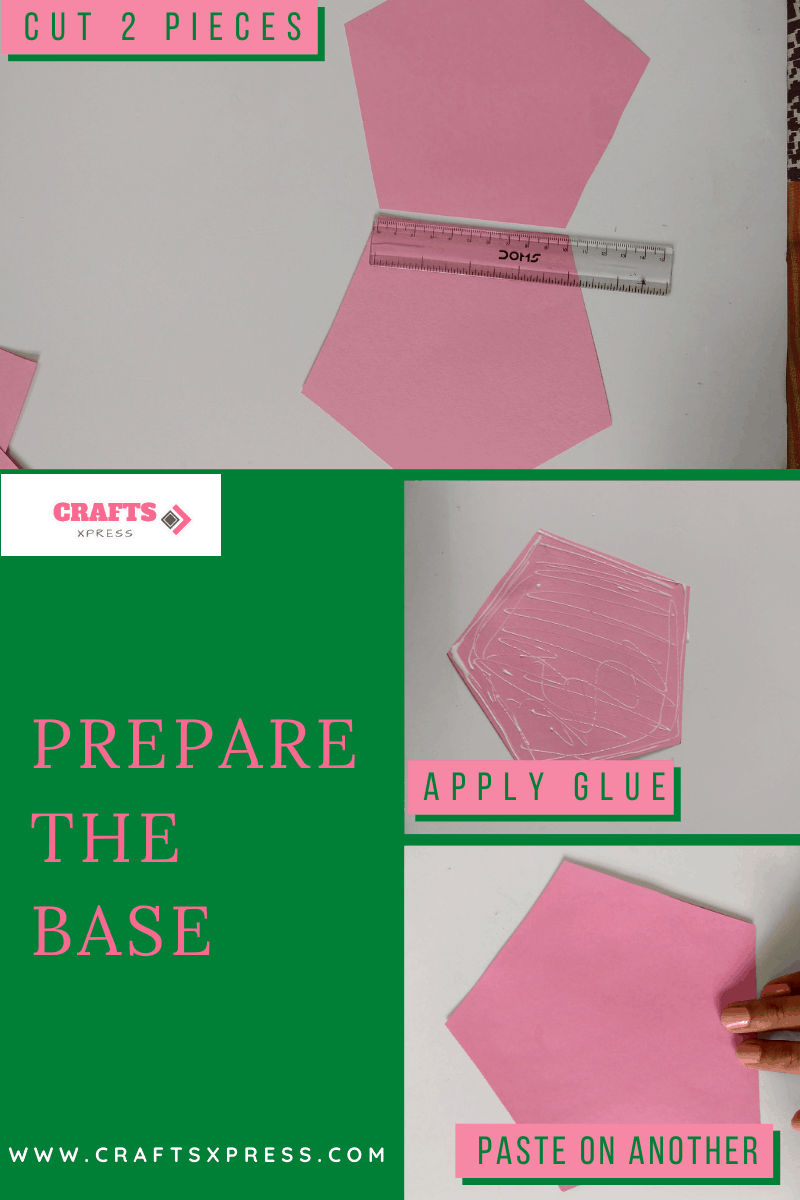
Step 8: Prepare a supporting base for rose
Make a pentagon on chart paper of each side 10 cm in length. Cut out this pentagon out of the chart paper. Prepare two such pieces.
Apply glue on the one side of the one pentagon and paste another pentagon piece over it by completely overlapping. Paste it.
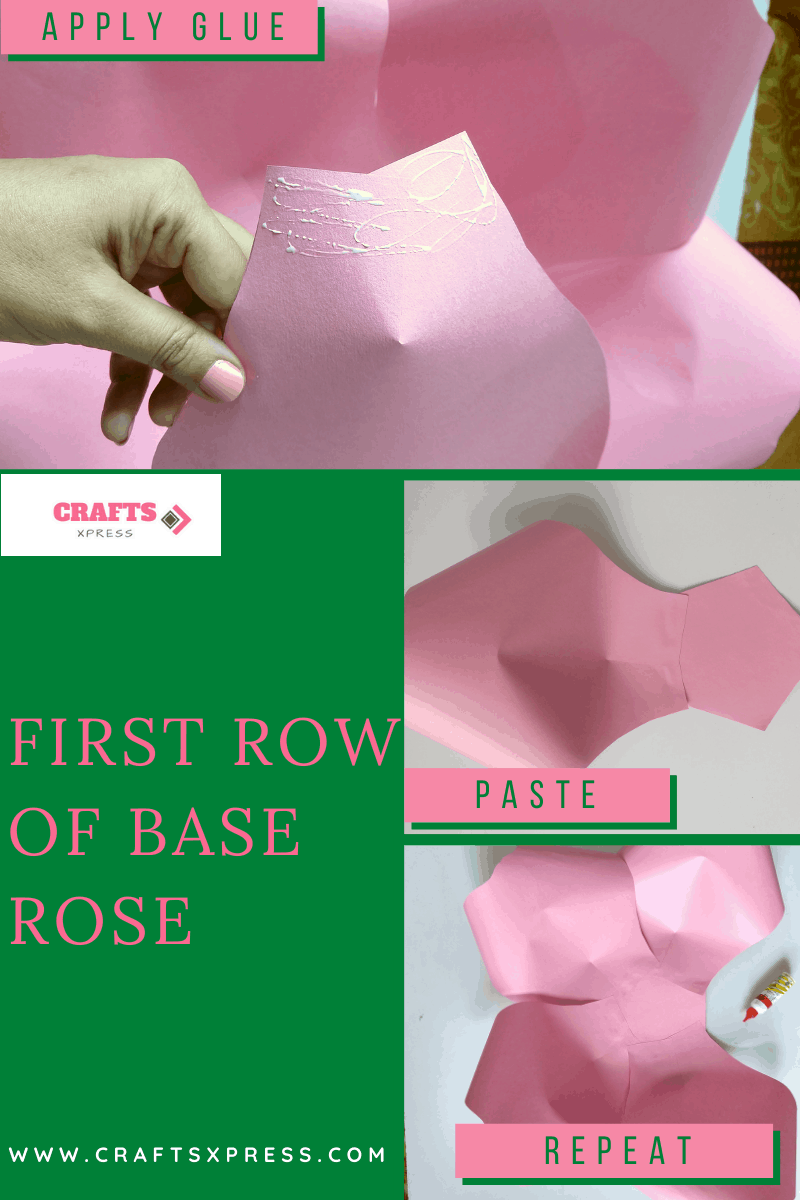
Step 9: Create the first circular row for base rose
For this take previously made pentagon.The pentagon has 5 sides, each of the side 10 cm long. First of all apply glue on one side. And then pick up a large sized petal. Paste the petal on the pentagon.
Furthermore, apply glue on second side of the pentagon and pick up one more large petal and paste the petal on the pentagon. Likewise paste all the 5 petals one bye one on the pentagon shaped base.
It will create a circular row on the base. For more clarity, see the image below.
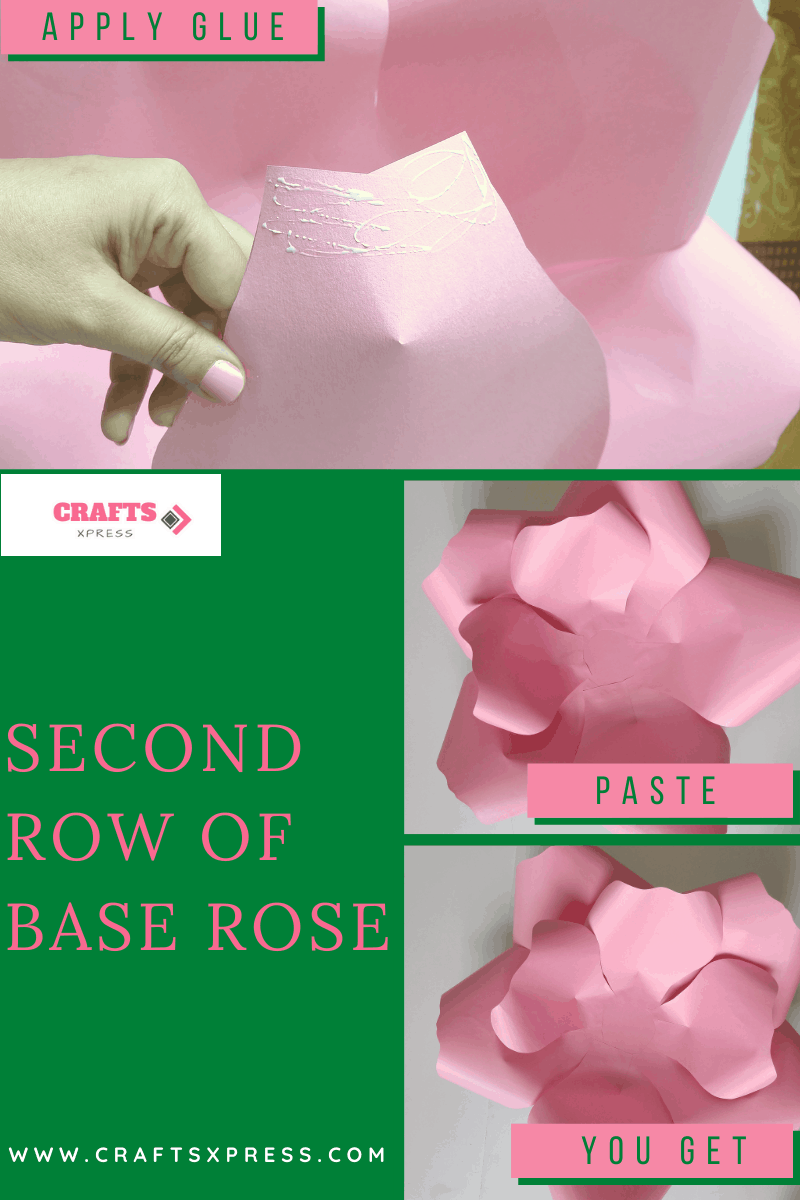
Step 10: Create the second circular row for base rose
Next step is to paste the medium petals on the base in second circular row. For this apply glue on the backside of base of the medium sized petal. And paste this petal a little ahead of large petals.
Paste total 5 medium sized petals likewise you did large petals.
Till now you have two circular rows of the petals on the base. One of large petals and another one is of medium sized petals.
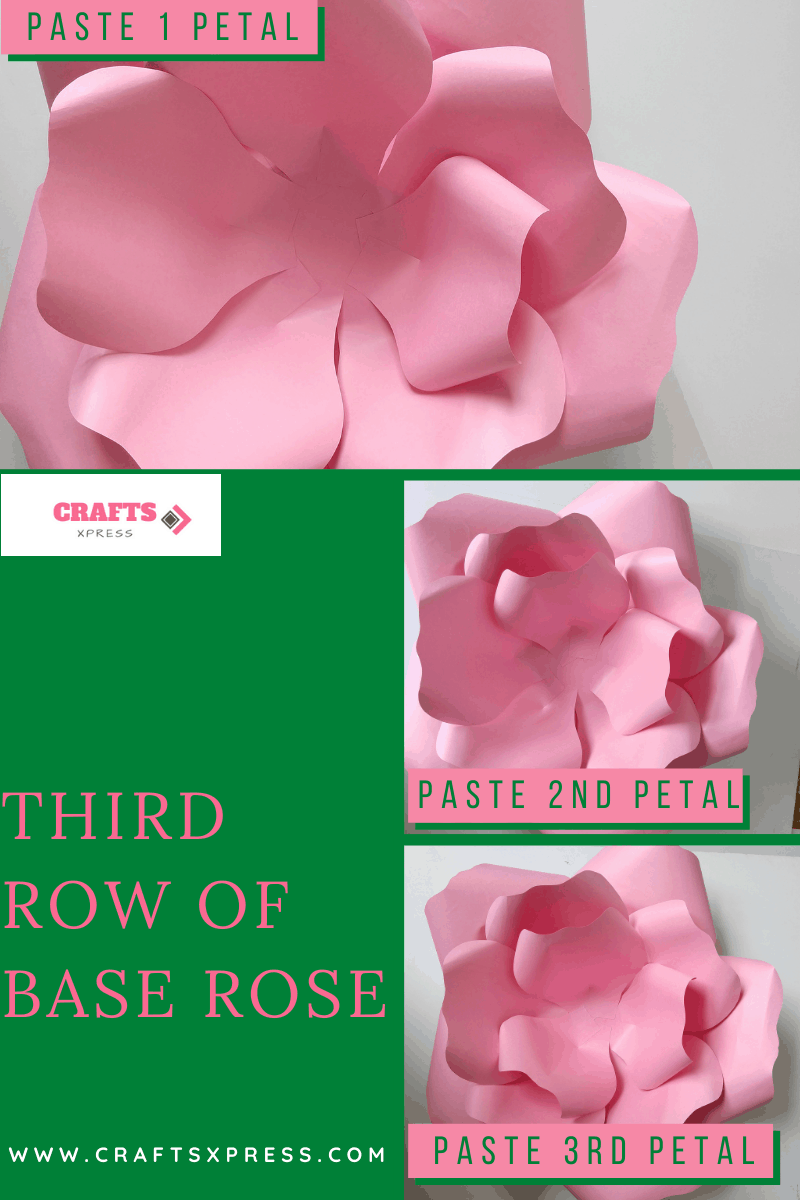
Step 11: Create the third circular row for base rose
Now you have 3 more medium sized petals. Paste one by one all of these three petals in the third circular row. These petals are a little ahead of previously pasted medium sized petals. Now base rose is ready.
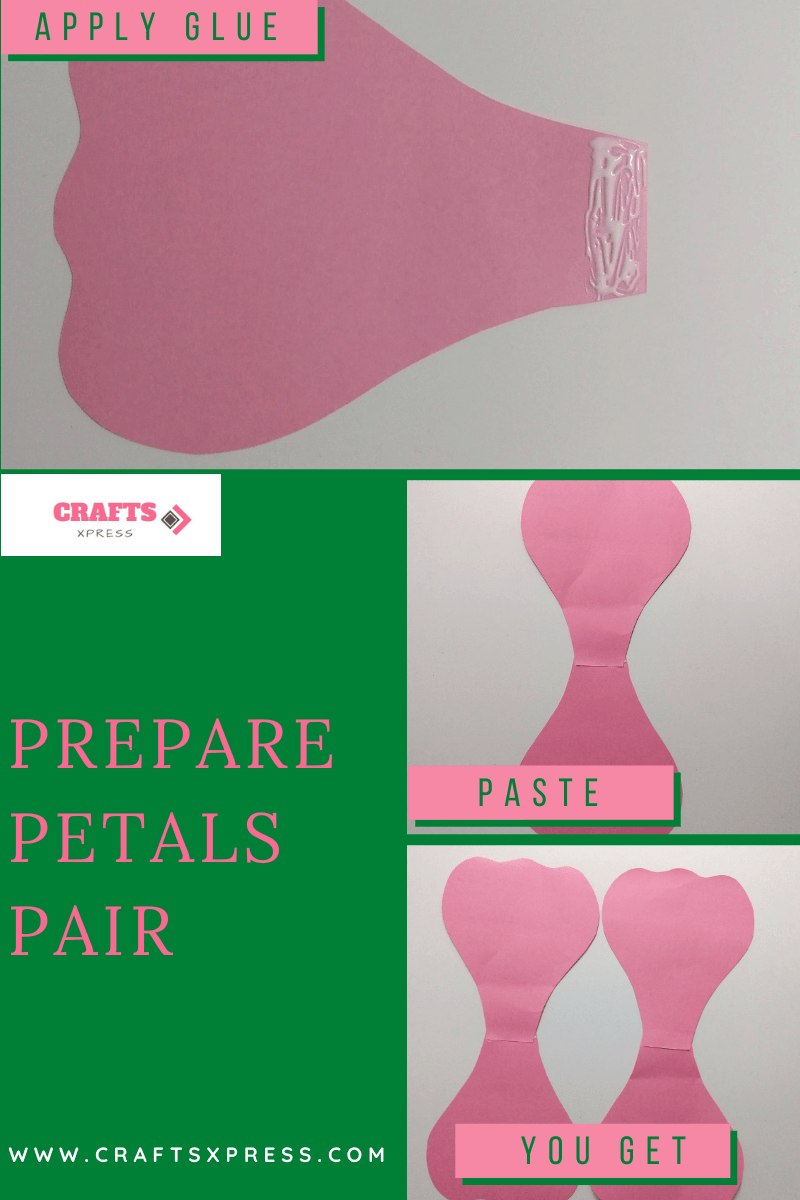
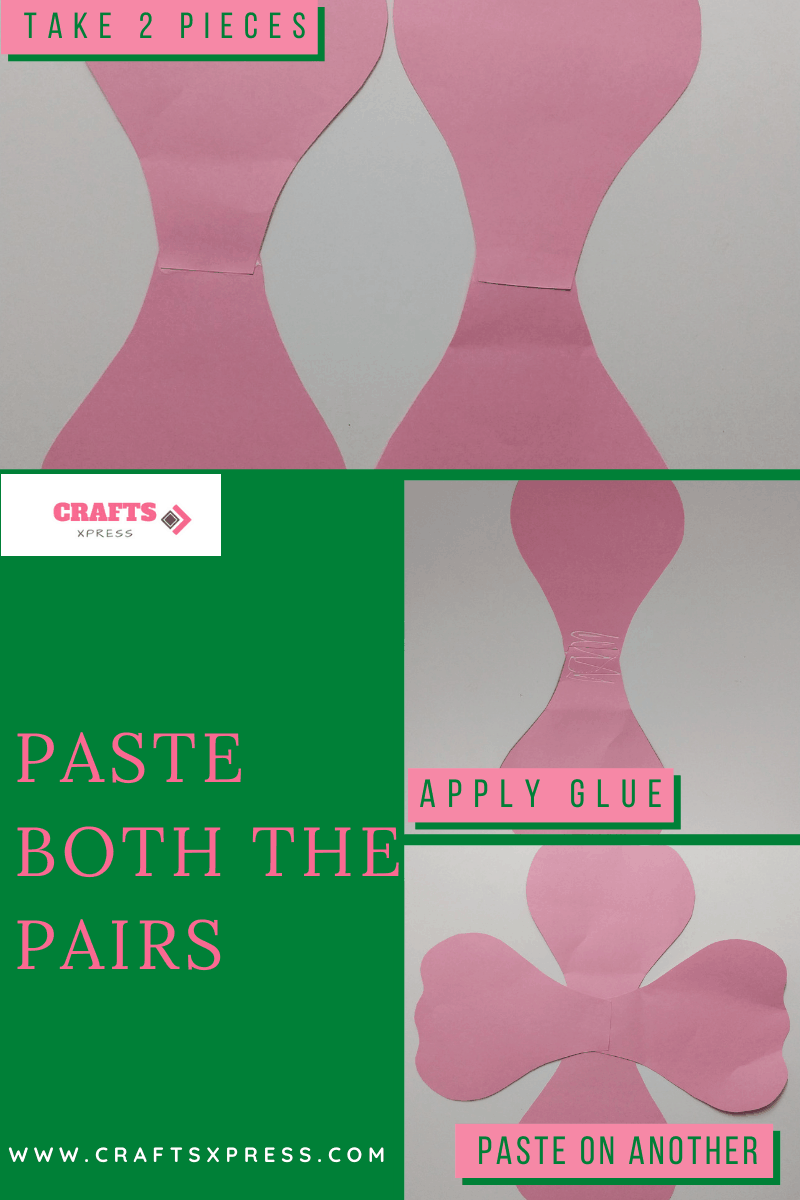
Step 12: Prepare the Rose Centre – Paste the petals opposite to each other.
Pick up two extra small petals. Place both of them on your table top in a way that their tops are in opposite direction and their bases overlapping.
Apply glue on the base of one petal and then paste base of another petal on it by overlapping the bases (as shown in the image below). Similarly, prepare one more pair of extra small petals.
Step 13: Paste both previously made pairs together
After that paste the two previously made pairs as shown in the image. For this pick up one pair and apply glue in the middle of the pair. And then paste another pair on it. The final look will that be of a ‘+’ sign.
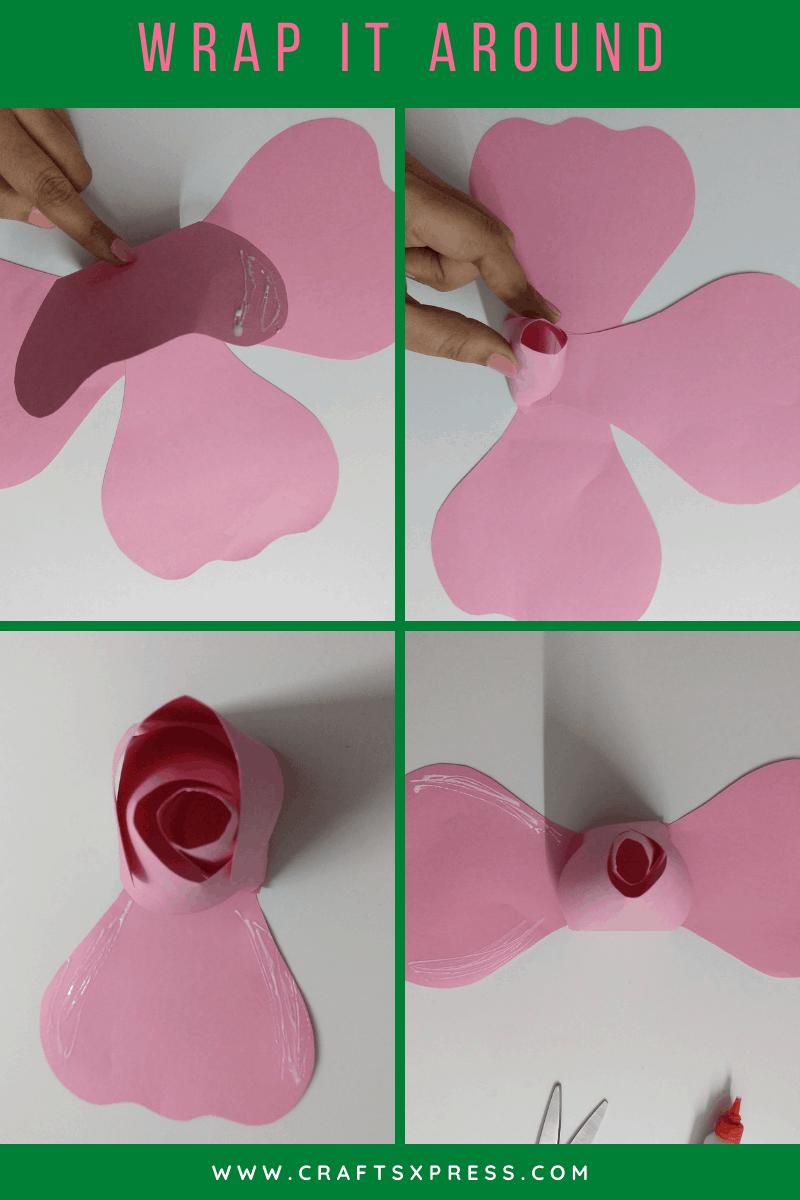
Step 14: Wrap the petals around one by one
Now, It will look like a flower with four petals. Roll one petals around itself and secure it with the glue. Now wrap around with another petal which is just opposite to it and paste with glue.
Now go with the third petal. Wrap it around a little loose this time and paste it. Likewise, do the same for the forth petal.This will be your innermost rose center.
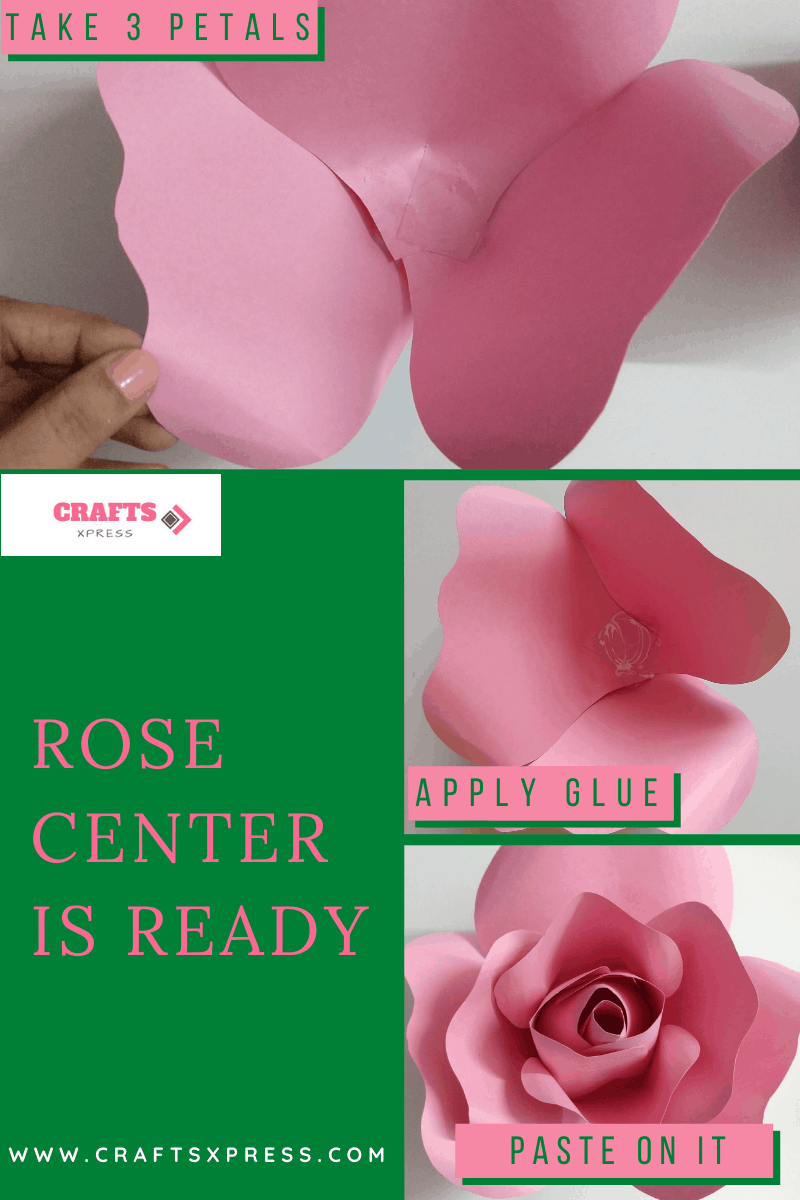
Step 15: Arrange rest of the four extra small petals
You are now left with 4 extra small petals. Make some curls on them with the help of pencil.
Apply glue on the base and side of the petal (as shown in the image below) and the paste it along with the innermost rose centre. Similarly paste another petal just opposite to the previously pasted petal.
In similar fashion paste rest of the two extra small petals.
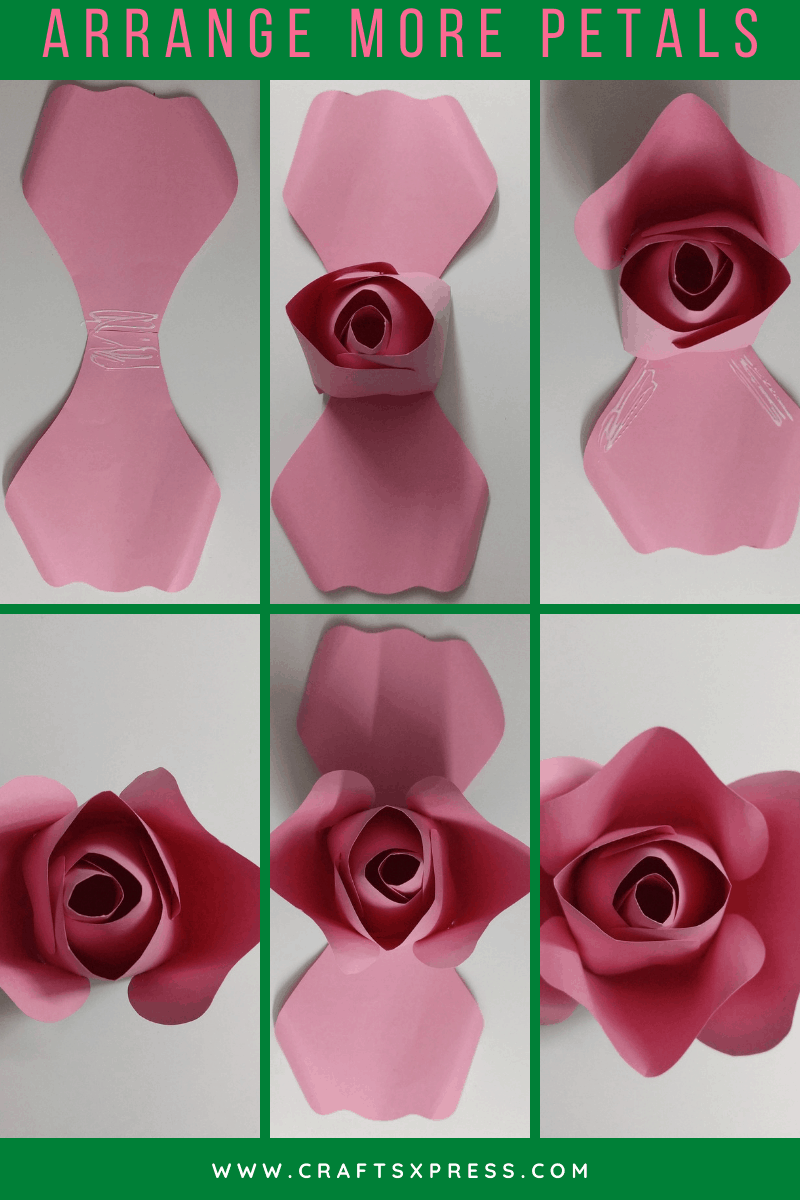
Step 16: Arrange 3 small petals
Now paste all the three small petals one on another. You will get an arrangement like shown in the image below.
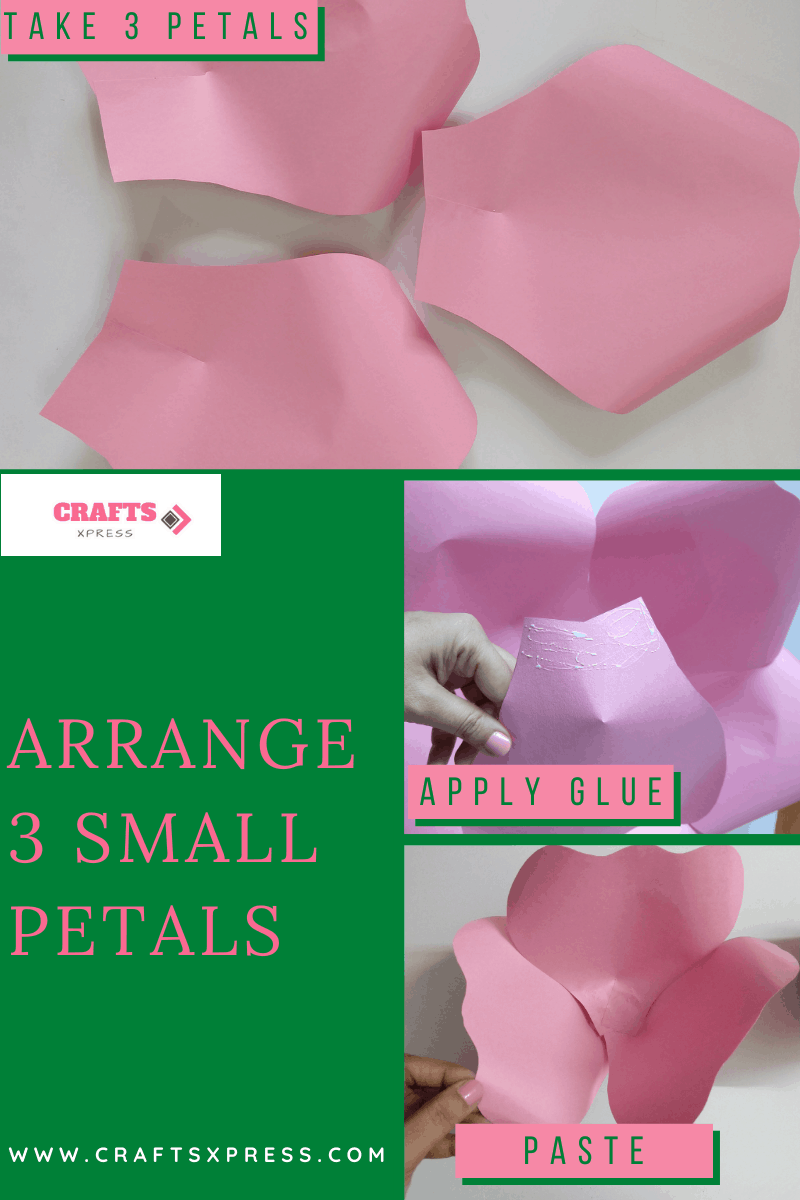
Step 17: Paste the previously made rose centre into the arrangement of the small petals
Paste the previously made rose centre into the arrangement of the small petals. Now your rose centre is ready.
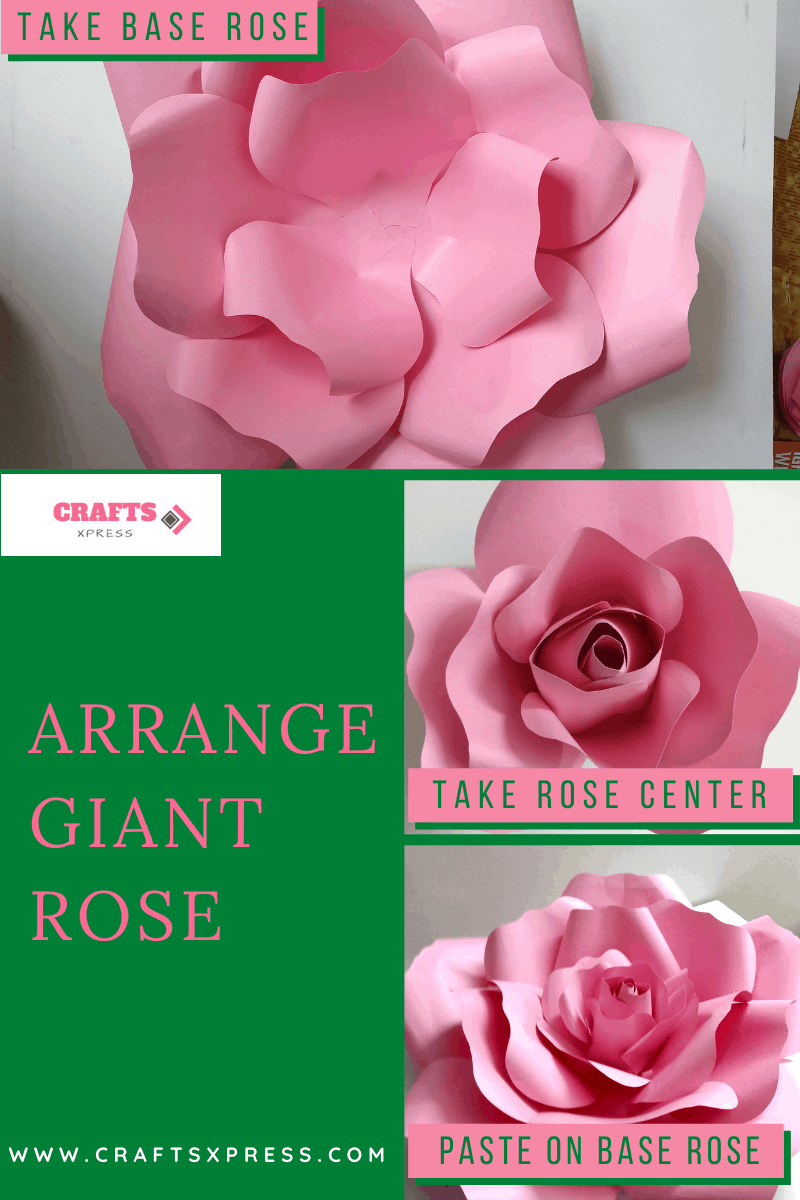
Step 18: Arrange giant rose
Finally, paste the rose centre in the middle of the base rose.
Now your beautiful giant rose is ready.
Certainly, making this giant rose in step by step manner is very easy. But still there are some important points which are going to be very helpful to you while making giant rose.
| Use hard paper for making templates
For making templates you must use any hard paper because you are going to use these templates again and again in tracing the petals. |
| Do not try to cut more petals at once
To cut short the time duration please do no try to cut more petals at once. It will give rough edges to your petals. So avoid it. |
| Use pentagon as supporting base rather than a circle
Use pentagonal shapes base rather than circle. Reason being, they will give a nice idea about the distance at which you are going to paste your next petal. |
| For quick results of gluing use glue tool
For quick results of pasting, use glue tool rather than ordinary glue. If you are using ordinary glue you have to hold your petals for few seconds for pasting them. |
| Overlapping flaps during preparing leaves
After making the slit at the bottom of the petal while pasting the flaps by overlapping, you must be careful while overlapping these flaps. Reason being, the more you overlap during pasting the more your petal looks uplifted towards upper side. |
| While cutting, move paper rather than scissors
Be careful while cutting the petals. Move paper more rather than scissors. It will give your cutouts a smooth edges. |
DIY Uses of Giant Roses at Home
Making DIY giant roses are a very satisfying craft. You can use these stunning roses in many ways.
- Giant roses are the perfect backdrop at wedding, baby shower, birthday party or any house party.
- Backdrop with a giant rose looks very gorgeous. It enhances the ambience of any party.
- Beautiful giant rose can be a fascinating wedding bouquet.
- You can surprise your loved once with your DIY giant rose.
- It can surely enhance the looks of your wall, whether it is bedroom or living room.
- If you planning to give a gift to your loved once which is big in size then giant rose can be a perfect gift. It will increase attractiveness to your gift.
I hope you enjoyed my blog. Honestly speaking, this is only my fourth attempt in making a giant rose. So, if I can do, you can do it as well. So try this DIY giant rose. You can write to me if you have any questions.