If you’re wondering how to make a small rose using twisting method, I am right here to help you get started.
Making small roses out of paper are one of my favourite crafts. Hence, I would love to share the entire methodology with you in this blog.
Let’s get started.
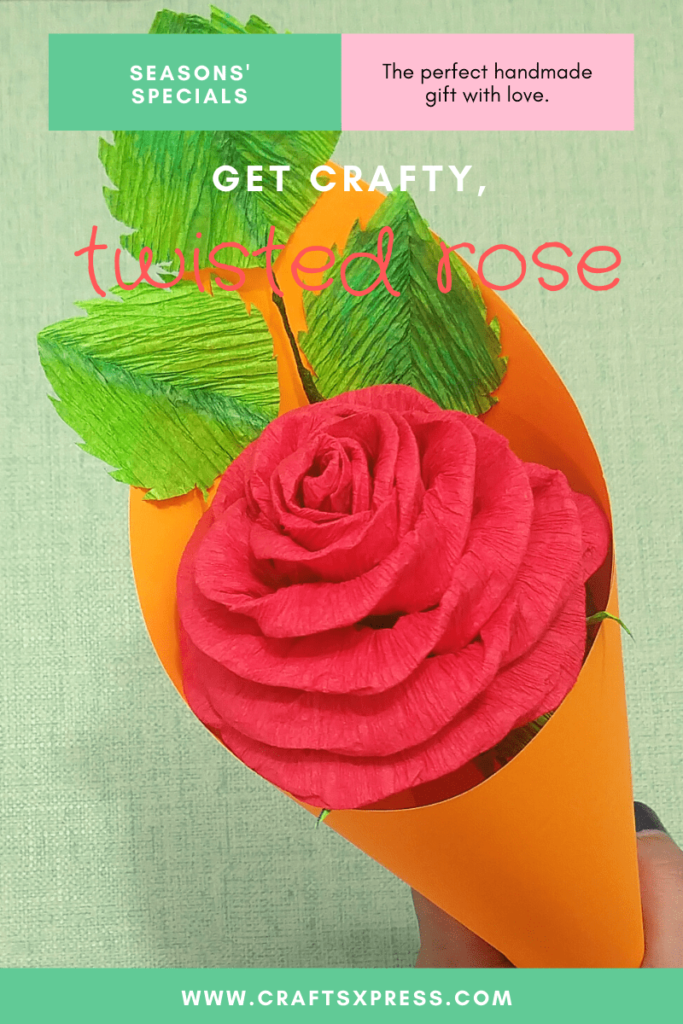
Learn How to Make a Small Rose Using Twisting Method in Just 10 Minutes
In my blog, I will share with you 12 super easy steps to make a small paper rose with a twisting method. These are really easy to make and need minimal supplies. So, let’s get started.
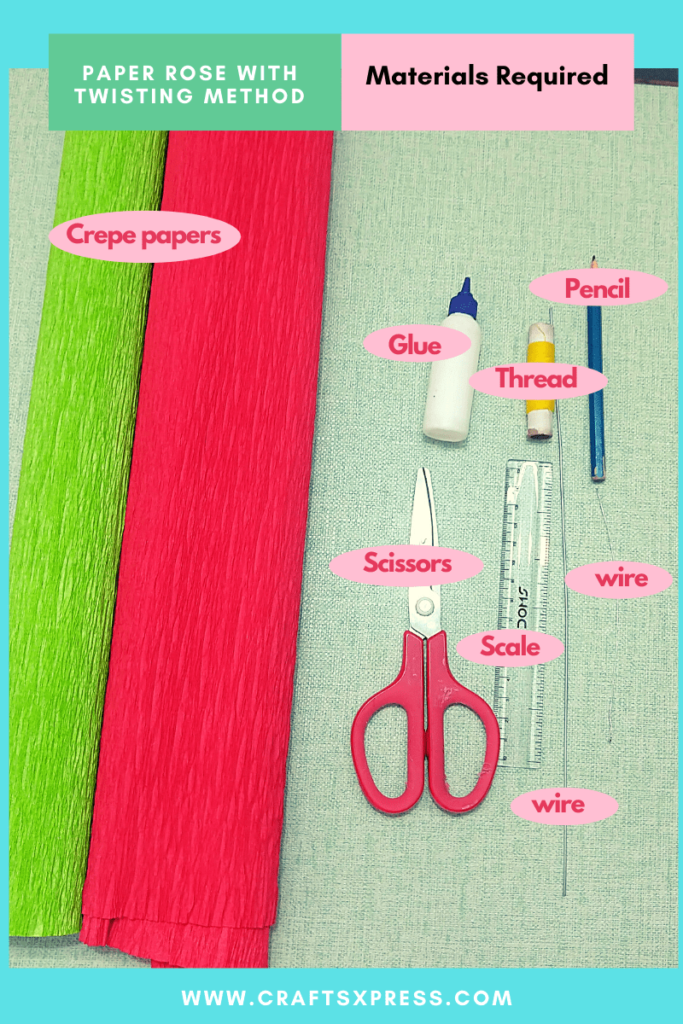
Materials Required To Make a Small Paper Rose
In order to make cute paper roses, you will be needing very easily available craft supplies.
| Crepe Paper
Use a crepe paper for making a rose with twisting method. Because it is easy to stretch and fold. By doing so we can give them a natural look. |
| Wire
You will need a little thick wire to make stems for your paper roses. Also, you will be able to tuck the paper roses in bouquets used for gifting or perhaps just twist stems around. And you will need some thin wires to tuck your leaves. This will give a natural look to your leaves. |
| Scissors
You can use any medium sized scissors available at home. |
| Glue
Any paper glue available at your home can be used. For quick results you can use a Glue Tool. |
| Pencil
Pencils for marking the size of different petals will be needed. |
| Scale
A scale will be needed for measuring the size of the petals and leaves as we have to make them of different sizes. |
| Thread
Last but important supply is a thread which we will use io tuck the rose with the stem. It can be of any color. |
Easy To Follow 12 Steps | To Make A small Paper Rose With Twisting Method
It’s time to get started and learn how to make a small paper rose in easy steps.
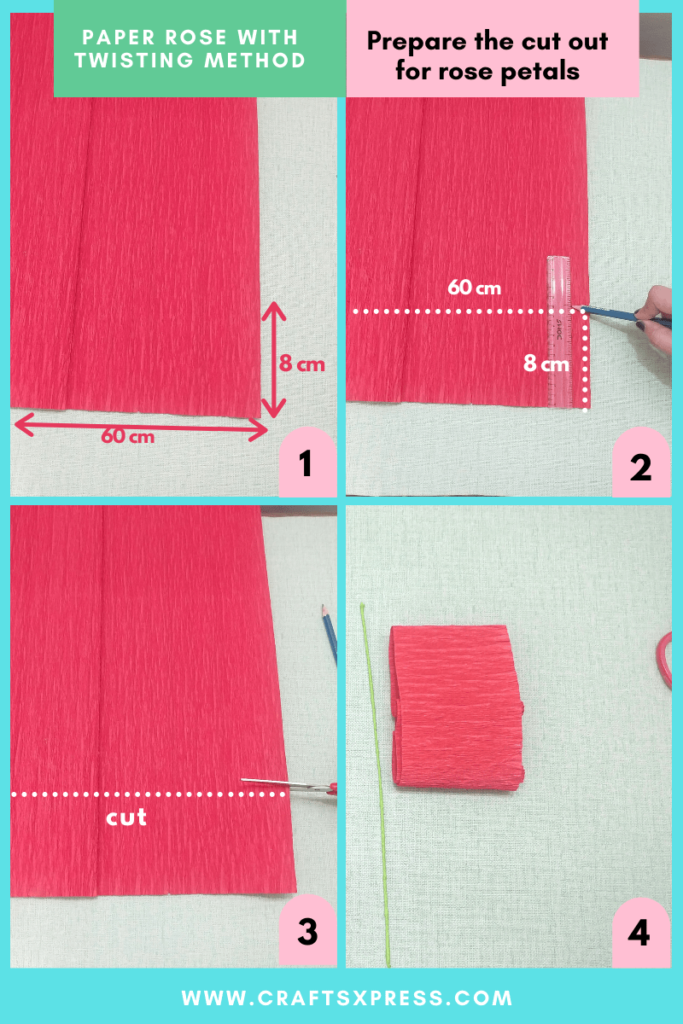
Step 1: Prepare the cut out for rose petals
- Get Ready With Your Red Crepe Paper: First of all take your crepe paper and put it on the table. Here I am taking red color crepe paper. You can take any color of your choice.
- Measurement of The Cut Out: After that with the help of scale measure the red crepe paper of size 60 * 8 cm(Length is 60 cm and Breadth is 8 cm)
NOTE: You can do variation in size of your rose just with increase/decrease the length of the red crepe paper cut-out at the above step.
- Draw: With the help of a pencil, draw the exact measurement (60 * 8 cm)
- Cut: After drawing the size of the red cut-out, just cut it. Cut the number of pieces of this red crepe paper according to the number of roses you are going to make.
Step 2: Prepare the leaves
- Get Ready With Your Green Crepe Paper: Take your green crepe paper and put it on the table
- Measurement: After that with the help of scale measure the paper of size 8*6 cm
- Cut: Now cut through the measurement.
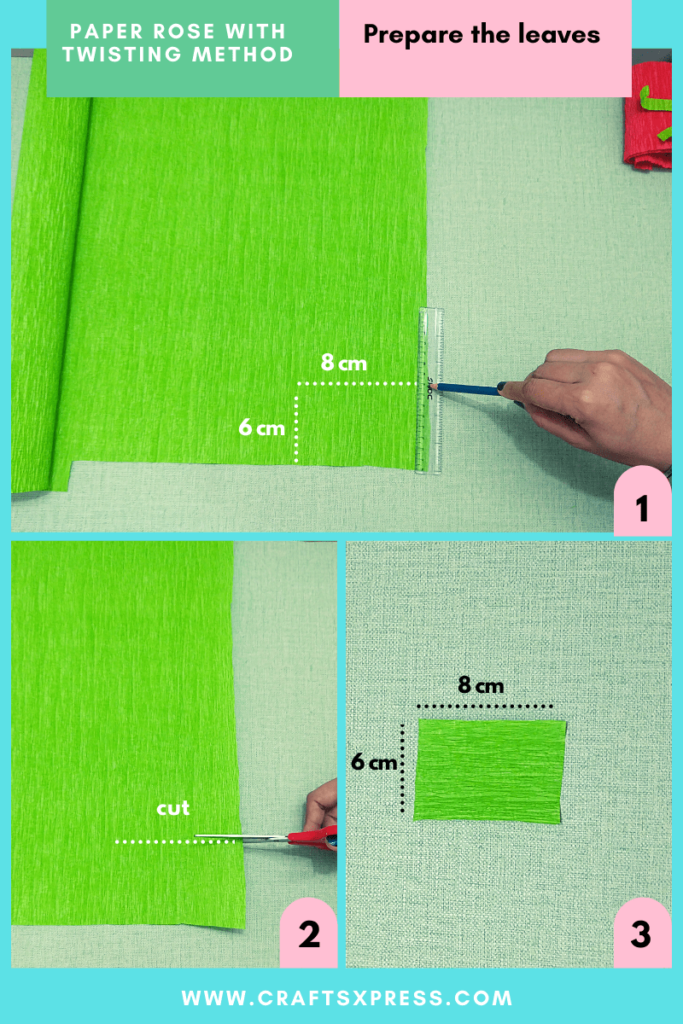
- Diagonal Cut: After that cut each piece diagonally with the help of Scissors.
- Flip: After cutting diagonally, flip any one out of two pieces of each of 8*6 cut-out
- Paste: Apply glue on the diagonal edge of the leaf. Pick up the thin wire of length 10 cm and paste both the pieces of diagonally cut sheet on the wire as shown in the above image.
- Draw: After drying it, draw a rose like leaf on this.
- Trim: Finally, trim it. And by doing so you get a natural looking leave. Likewise prepare the other two leaves.

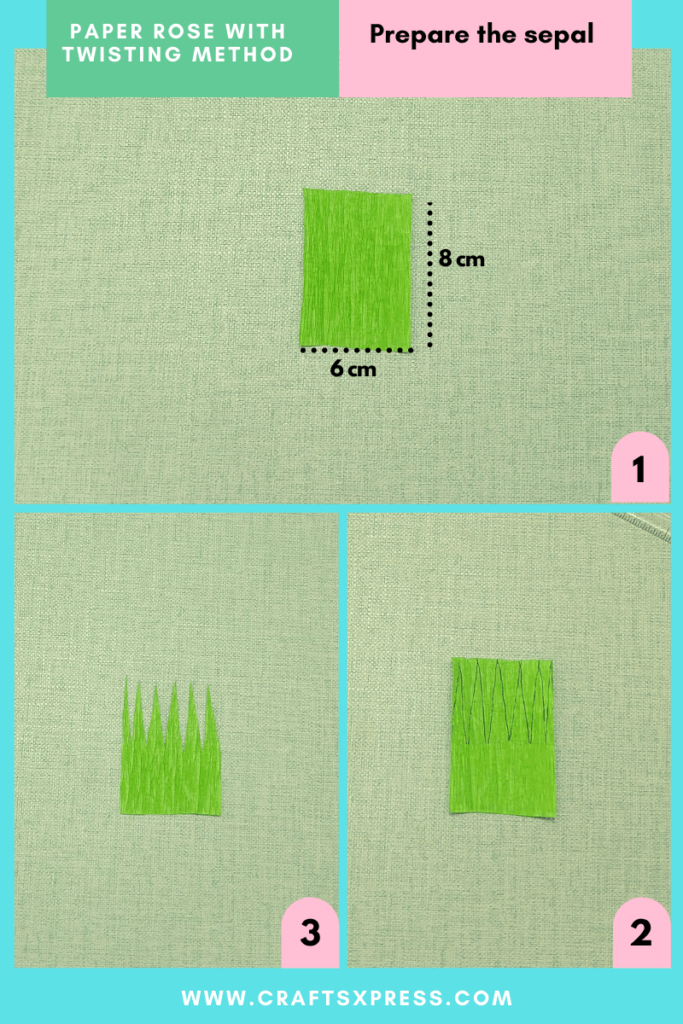
Step 3: Prepare the Sepal
- Measurement: Measure a rectangular piece of size 8*6 cm out of green colored crepe paper.
- Draw Zigzag line: Hold the paper like the way all the creases look vertically. Further draw zigzag lines on the rectangular strips with the help of pencil.
- Cut: Cut through the zigzag line with the help of Scissors. And you will get your sepal. Just stretch it a little.
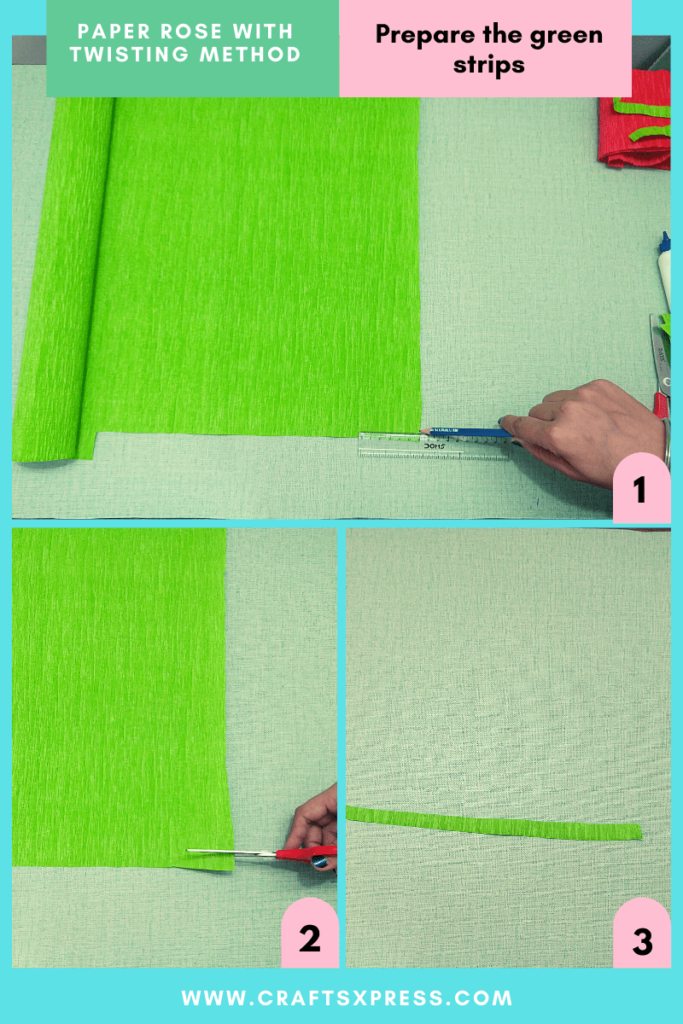
Step 4: Prepare the green stripe
- Take Your Green Crepe Paper: Put your paper on the table.
- Measurement: Measure width of 1 to 1.5 cm and length should be 30 cm for one stripe. You will need 2-3 such stripes.
- Cut: So, cut 2-3 stripes out of green crepe paper. But make sure you hold the paper correctly. Make a cut opposite to the crease, not along the crease on the paper.
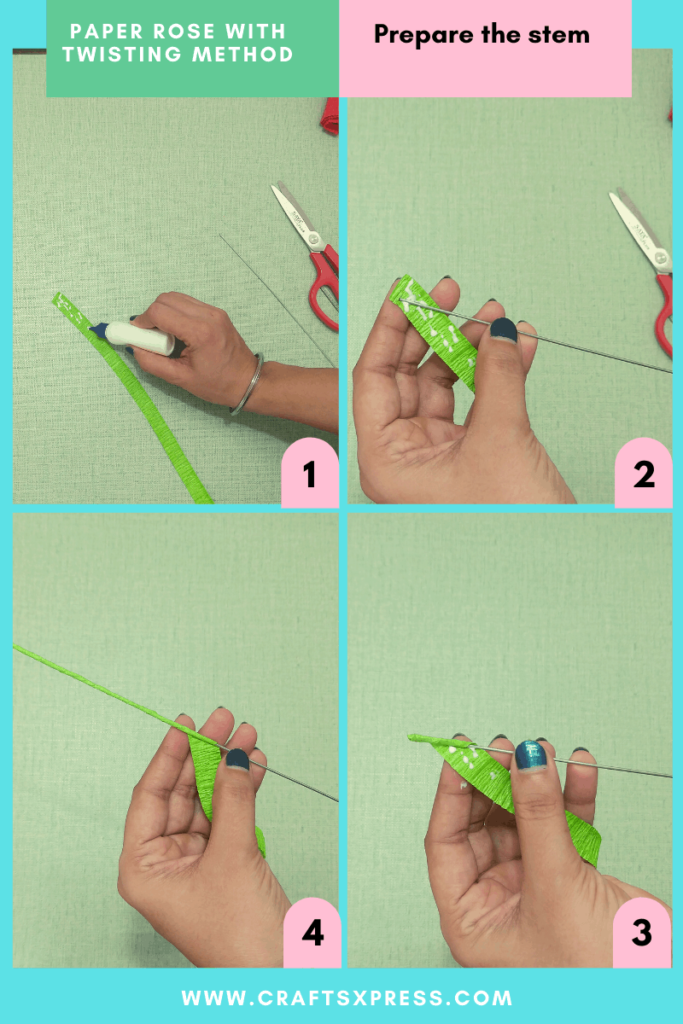
Step 5: Prepare the stem
- Take Green Stripe And Thick Wire: Firstly, take one green stripe and a little thick wire.
- Apply Glue: Secondly, apply some glue on the paper stripe and put wire on it a little slanting.
- Wrap It Around: Finally, wrap the paper stripe around the wire to cover it completely. Same procedure applies to cover up the bunch of leaves.
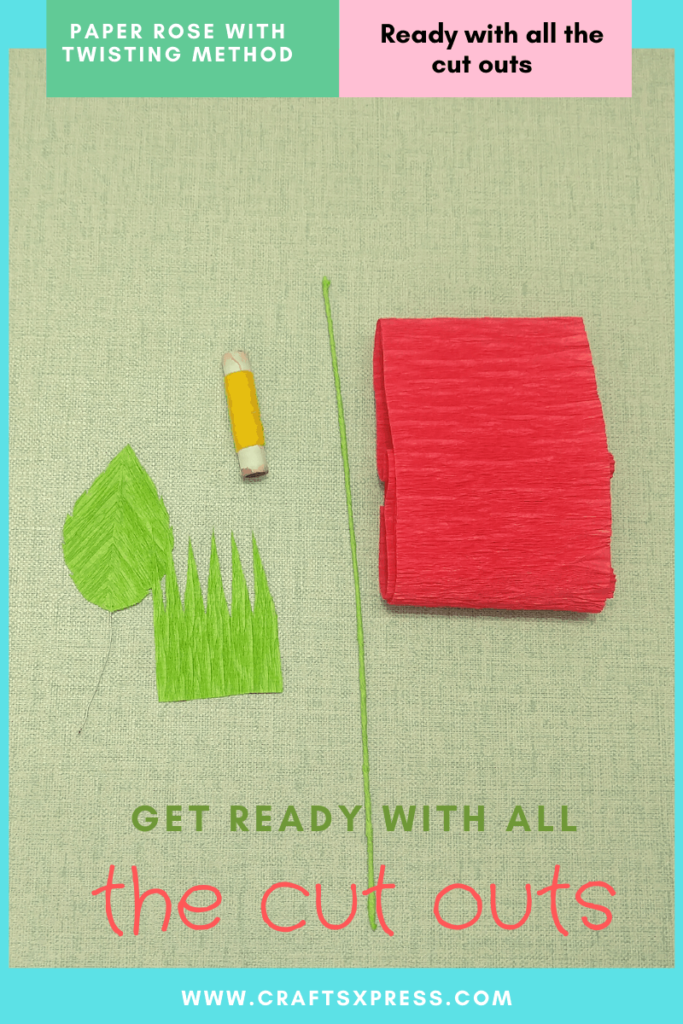
Step 6: Ready with all the cut outs
- Now you are ready with all your cut-outs, covered stem and leave. Let’s move to the twisting procedure.
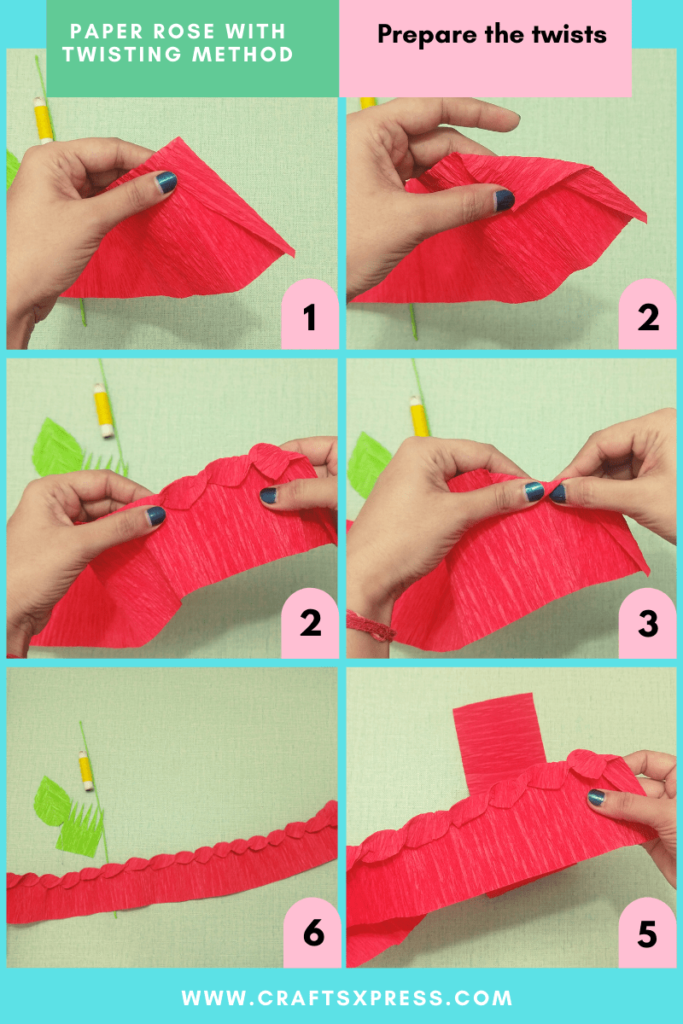
Step 7: Give twisting effects to the red cut outs for the petals
- First Fold with 25°: First of all hold the red cut out like the way that crease of the paper should be vertical. And then, fold its right end with 25° angle(means fold it slightly)
- Second Fold with 45°: After making first fold, make another fold in a same way but with 45° angle(slightly more than the previous fold)
- Hold It With your Left Hand Thumb: Now hold these folds in your right hand. And press the folds with your right thumb
- Twist It With Right Hand Thumb: Furthermore, while pressing with right thumb, twist the lower end of the second fold backward.
- Repeat: After this, fold with your left hand and twist with your right hand. repeat this process till you reach to the other end of the paper.
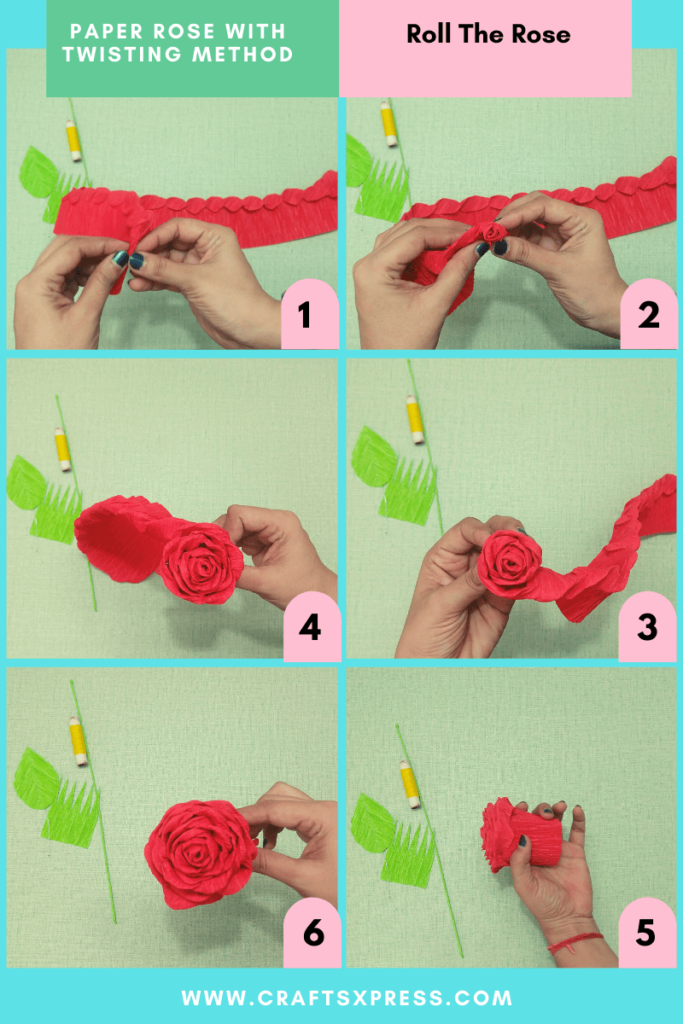
Step 8: Roll The Rose
After completing all the twists, roll this twisted paper in outward direction. Roll and roll till the other end. Furthermore, apply some glue at the end part and paste it.
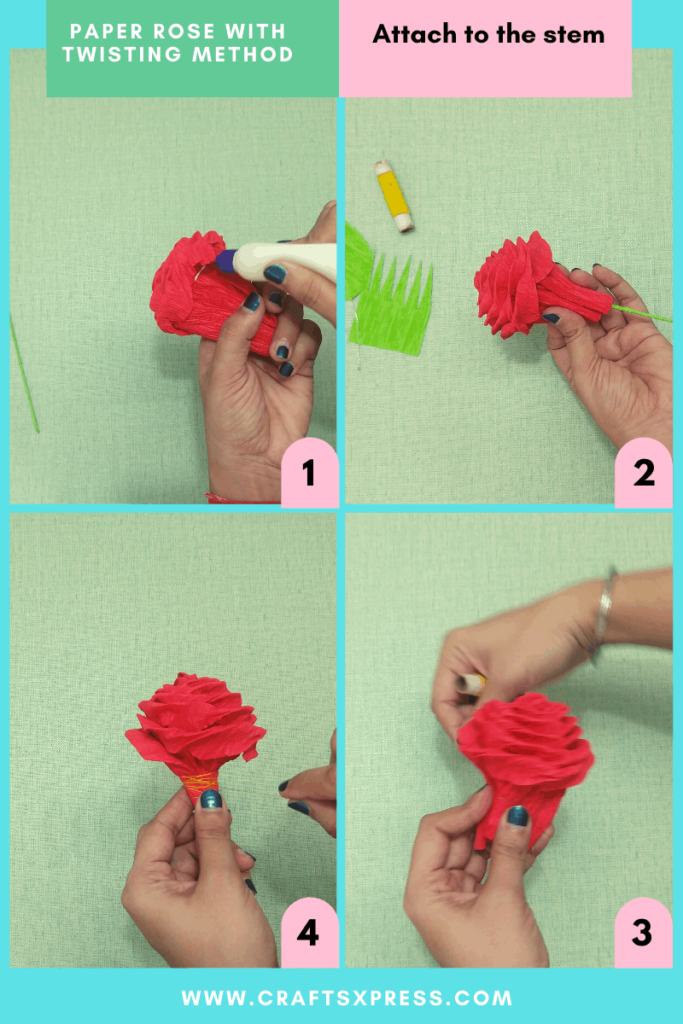
Step 9: Attach to the stem
First of all apply some glue on the stem and insert it in a loosely held rose. Next, take the thread and wrap the thread around the rose tightly to tuck the rose with the stem.
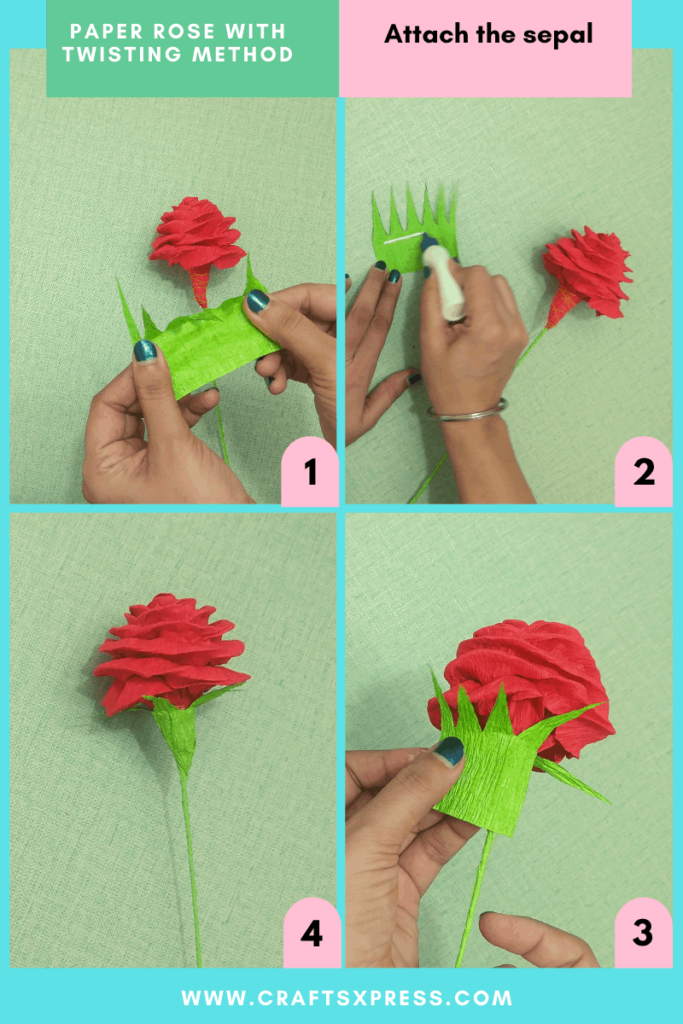
Step 10: Attach the sepal
- Stretch It Little: Firstly,take the sepal, stretch it a little with gentle pull.
- Apply Glue: Secondly, apply glue on it. And spread the glue very well.
- Wrap It Around: Lastly, wrap it around the rose to give your rose a natural look.
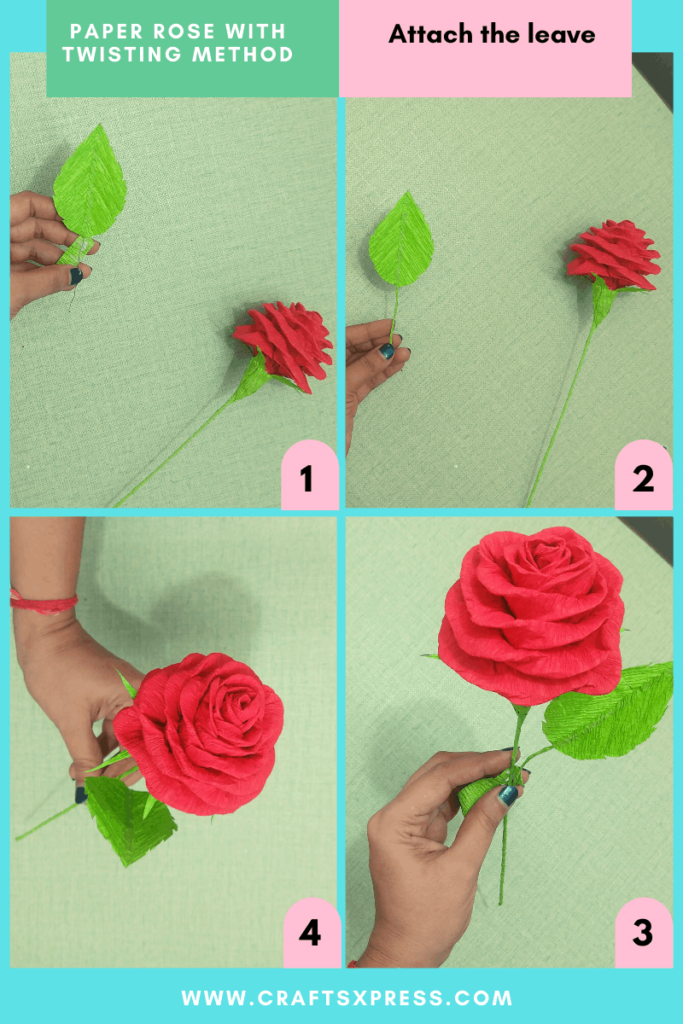
Step 11: Attach the leave
Take the leave and place it at the appropriate position to the stem. Then Take green strip , Apply some glue on it. And wrap it around the stem for tucking the leaves at that place.
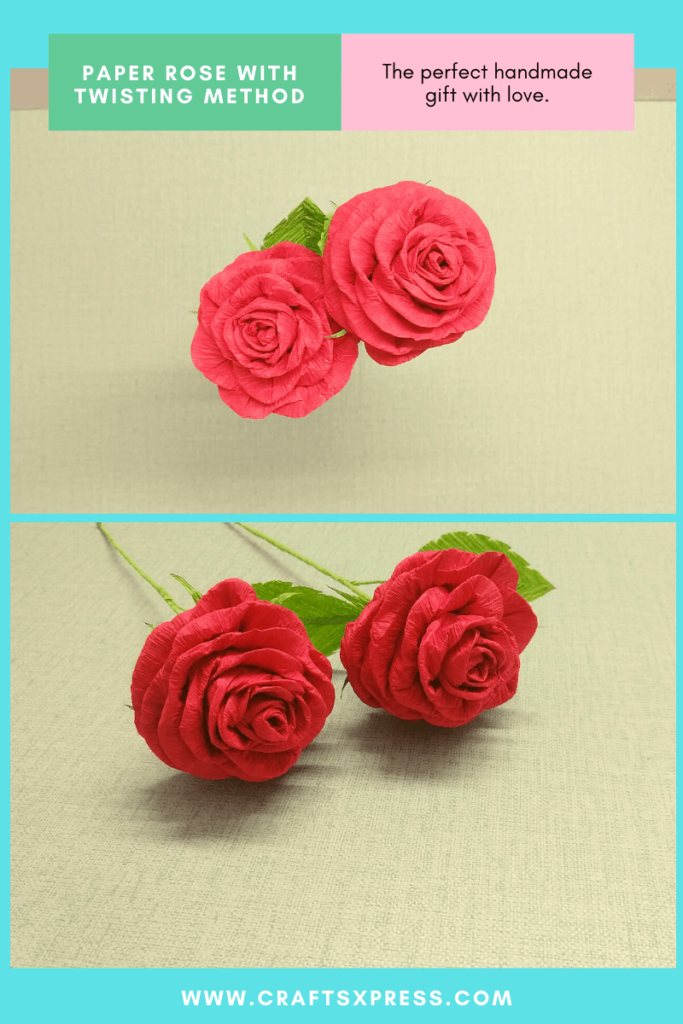
Step 12: Ready To Blossom
WOW! Your very own and cute crepe paper rose with a twisting method is ready to blossom.
Why Choosing Crepe Paper is Mandatory for Making a Small Rose with Twisting Method
As a DIY Blogger, I always recommend beginners to use Crepe Paper for making roses. It is friendly to use and convenient. I’d like to talk a little more about it.
Crepe paper is actually a tissue paper; the difference is due to the manufacturing process. In reality crepe paper is creased tissue paper. And it is this crease that gives this paper a wonderful stretching property.
All thanks to this property, we can stretch it and can make charming flowers. This single quality of stretching makes crepe paper easy to use and imparts roses a natural look.
Hence, always go for crepe paper when it comes to making DIY roses at home.
Five Beautiful DIY Paper Roses Ideas You Must Try
Since you have an interest in making paper roses using a twisting method, do try your creative minds at the following five DIY paper rose forms as well.
1. Small roses with paper strips
Small paper roses using paper strips are quite simpler for beginners.
Using any types of paper strips, you can make paper roses very easily. Even you can use fabric strips, ribbon or foamiran sheets for these pretty roses.
For this you have to just fold the strips in a particular way. For a bit small rose you have to take a little wider strip of paper and for a tiny one take a narrow strip of paper.
2. Real looking paper rose with stem and leave/s
“Who does not like real looking red roses”- Am I right? Everyone likes these. With the help of crepe paper and with a little practice you can make your own beautiful red roses with stem and leaves.
Almost on every occasion you like to give these lovely roses to your loved ones so do not wait just go through the tutorial and make these.
3. Giant Paper Rose
What is more cuter than a giant paper rose ? A child posing with it. Each time I create a giant paper rose, I make my kids pose in front of it so as to witness the magnificence of the humongous size of that rose.
Most people feel that giant paper roses are difficult for beginners. But trust me, they aren’t hard to make at all. All you need is a little patience. The outcome is always so beautiful that you keep staring at it for hours.
Making DIY giant roses is a very satisfying craft. You can use these stunning roses in many ways. Use them for self decor or for birthday parties or even for gifts. Anybody receiving them will feel elated.
4. Small Paper Rose With Rolling Method
Small paper roses are pretty, dainty and easy to make. In fact, I have written an entire blog explaining all the step by step pictures needed for creating a small paper rose. Best part is that it is almost like making a rolling paper rose.
There are a lot of methods that one can use to make small paper roses. But I always go for the rolling paper method because it is simple to make them that way.
Having said that, you can surely choose to opt for other methods as well. But the result won’t be half as alluring. On the contrary, small paper roses that are created using the rolling paper method are gorgeous to have around.
5. Paper Rose From Old Book Pages
Paper roses from old book pages can be used for making a beautiful bouquet, a wreath and also for decorating a gift pack with an antique look.
Making paper roses from old book pages is a good idea when you’d like to try some paper craft instantly but can not go for purchasing material. I’ve been doing it from the past so many years now.
Making paper roses from old book pages is quite simple. Most of the material required for this craft is easily available at home. Take any old book which you are not going to use anymore.
The Secrets Of Making Perfect Paper Rose
Here in the following points, I am sharing with you some secrets of making your rose perfect and beautiful.
| Do Not Hold Rose Too Tightly While Rolling
Hold the rose loosely hand while rolling, because it will give a nice natural look to your rose. |
| Make Twist Carefully
While making twists to your rose, twist it gently otherwise your paper will be spoiled. |
| While Cutting Paper See The Creases Carefully
During the process of preparing cut-outs, see the creases of the paper carefully. For example whether the crease should be horizontal or vertical for a particular cut-out. So be careful. |
| Roll In Outward Direction
I tried these beautiful roses many times and also did some experiments on it. So if you roll it inward direction then, it will not look so natural. So, make sure you roll it outward. |
| Tightly Wrap The Thread
When you attach the stem to your rose, wrap the thread tightly around it. Because it will tuck the rose nicely to the stem. |
| Wire
You will need a little thick wire to make stems for your paper roses. Also, you will be able to tuck the paper roses in bouquets used for gifting or perhaps just twist stems around. And you will need some thin wires to tuck your leaves. This will give a natural look to your leaves. |
I hope that I was able to help you learn how to make paper rose with twisting method. Let me know how they came out. If you have any questions or concerns, please drop them in the comments section below. Happy crafting!