How to make a paper rose with stem- Are you thinking about it? Great, now in next few minutes you are going to surprise yourself with a beautiful paper rose with stem and leaves.
There are several methods for making paper roses. For example paper roses with paper strips, roses with petal by petal, roses with rolling method and many more. In this blog however, I’ll share the ‘petal by petal’ method.
How to Make Paper Rose with Stem?
In my current blog, I will help you learn how to make a beautiful paper rose with stem. I will ensure that I add easy steps. This will help you learn quickly even if you’re a beginner.
I know you are super excited about the tutorial. Right? So without spending any seconds let’s move to the step by step procedure.

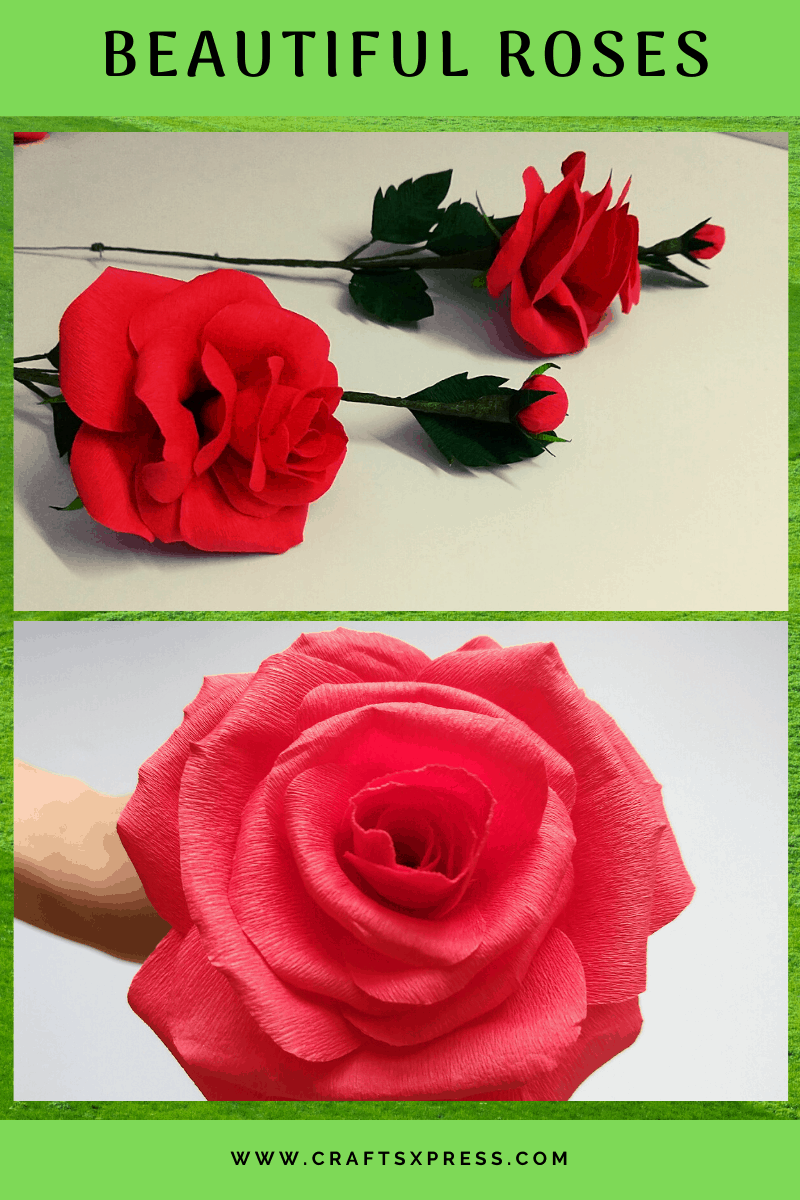
If you want to go through the video, I have uploaded one for the same. I’m sure, you will like these real looking paper roses.
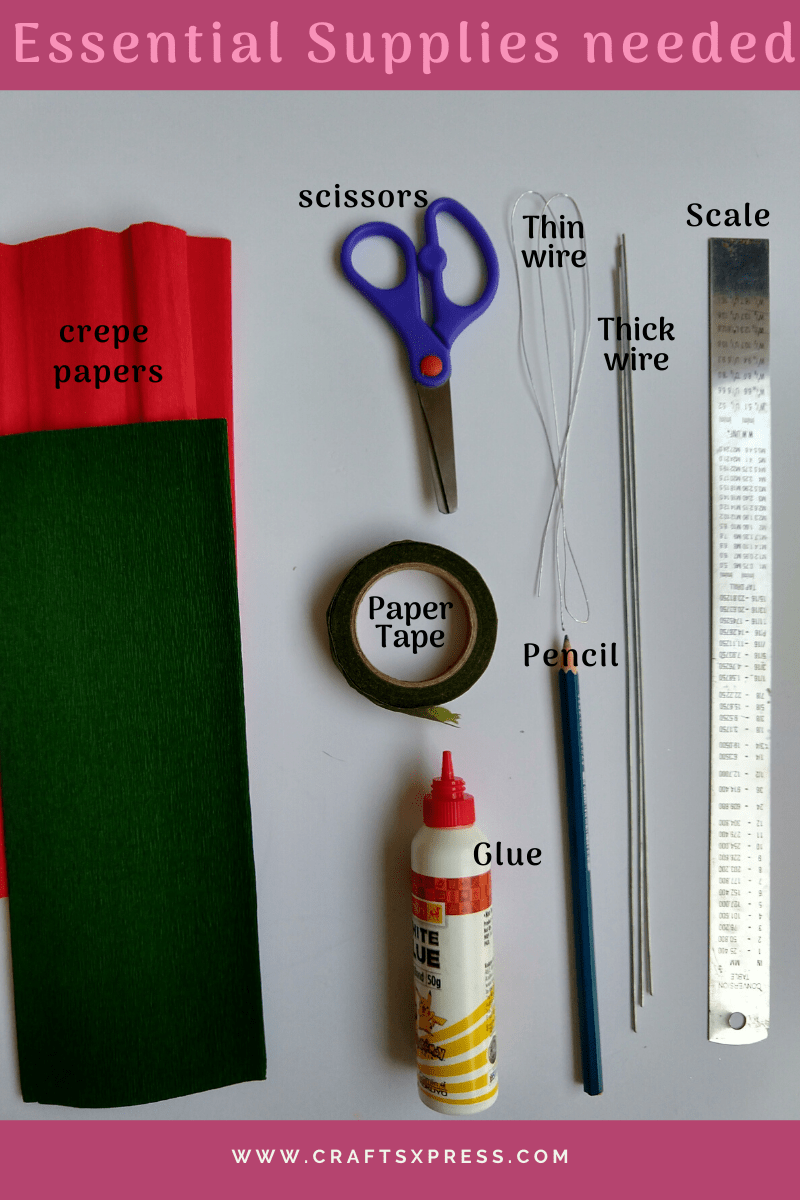
Material Required for Making Paper Rose with Stem
For making a paper rose using petal by petal method, you can get the required material very easily. You can either get it at a local crafts shop at the nearest market or you can even order it online on Amazon like I do because it’s convenient.
As a DIY paper crafts learner, you need the following material to get started for making paper roses with stems.
| Crepe Paper
Use a crepe paper for making a rose with stems. It is a good idea to make real looking paper roses with crepe paper reason being, it is easy to stretch and fold. By doing so we can give them a natural look. |
| Wire
You will need a little thick wire to make stems for your paper roses. Also, you will be able to tuck the paper roses in bouquets used for gifting or perhaps just twist stems around. And you will need some thin wires to tuck your leaves. This will give a natural look to your leaves. |
| Paper Tape
Use a paper tape as per your requirement. It comes in the form of many colors like green, brown etc. In case you are using it for the first time, you might assume the tape as not being very sticky. However in actuality it is and will come in handy. For better use just stretch the tape a little. It’s work. |
| Scissors
You can use any medium sized scissors available at home. |
| Glue
Any paper glue available at your home can be used. For quick result you can use a Glue Tool. |
| Pencil
Pencil for marking the size of different petals will be needed. |
| Scale
A scale will be needed for measuring the size of the petals and leaves as we have to make them of different sizes. |
Step by Step Instructions to Make Paper Rose with Stem
As a beginner, it is important that you are aware of each and every step that is needed for making a beautiful paper rose along with the stem.
Let me introduce you in the simple manner that will help you get started.
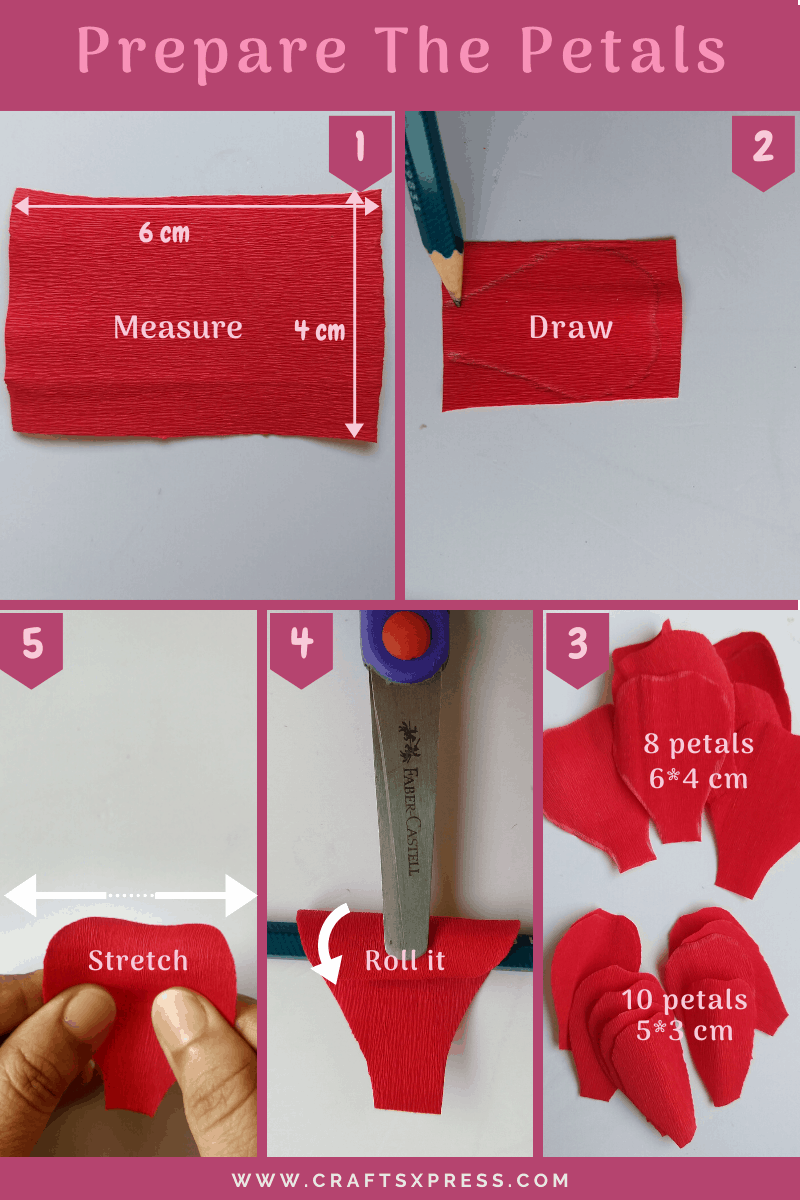
Step 1: Prepare the petals
- Measurement of petals: Firstly cut rectangular strips of measure 5*3 cm and 6*4 cm out of red crepe paper. You have to cut the 10 rectangular stripes of size 5*3 cm and 8 rectangular of size 6*4 cm so that we have total 18 petals.
- Draw: Further draw rose petal shape on the rectangular strips with the help of pencil.
- Cut: After that cut all the petals as drawn previously with the help of Scissors.
- Roll it : After Cutting the petals slightly rolls their upper edges with the help of pencil. It gives a nice curl to your petals.
NOTE: Give curls to all of your petals except 5 of size 5*3 cm (Small).
- Stretch: And then hold the petals like the way that your both thumbs should be on the middle of the petal. Now Stretch the petals slightly in outward direction. As a result, now your petal is looking like a natural leave. See, how real looking these petals are.
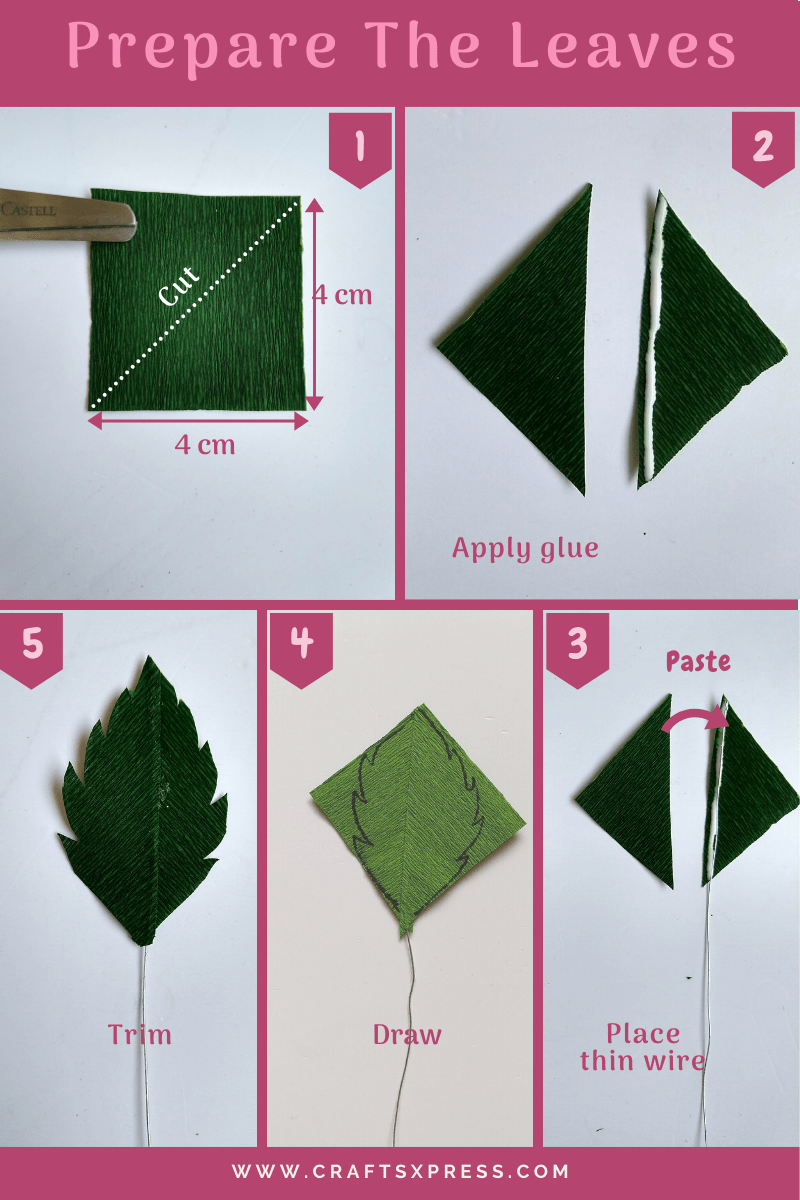
Step 2: Prepare the leaves
- Measurement:Take four square pieces of size 4*4 cm out of green color crepe paper.
- Cut: After that cut the each piece diagonally with the help of Scissors.
- Paste: Apply glue on the diagonal edge of the leave. Pick up the thin wire of length 10 cm and paste both the pieces of diagonally cut sheet on the wire as shown in above image.
- Draw: After drying it draw a rose like leave on this.
- Trim: Finally, trim it. And by doing so you get a natural looking leave. Likewise prepare other two leaves.
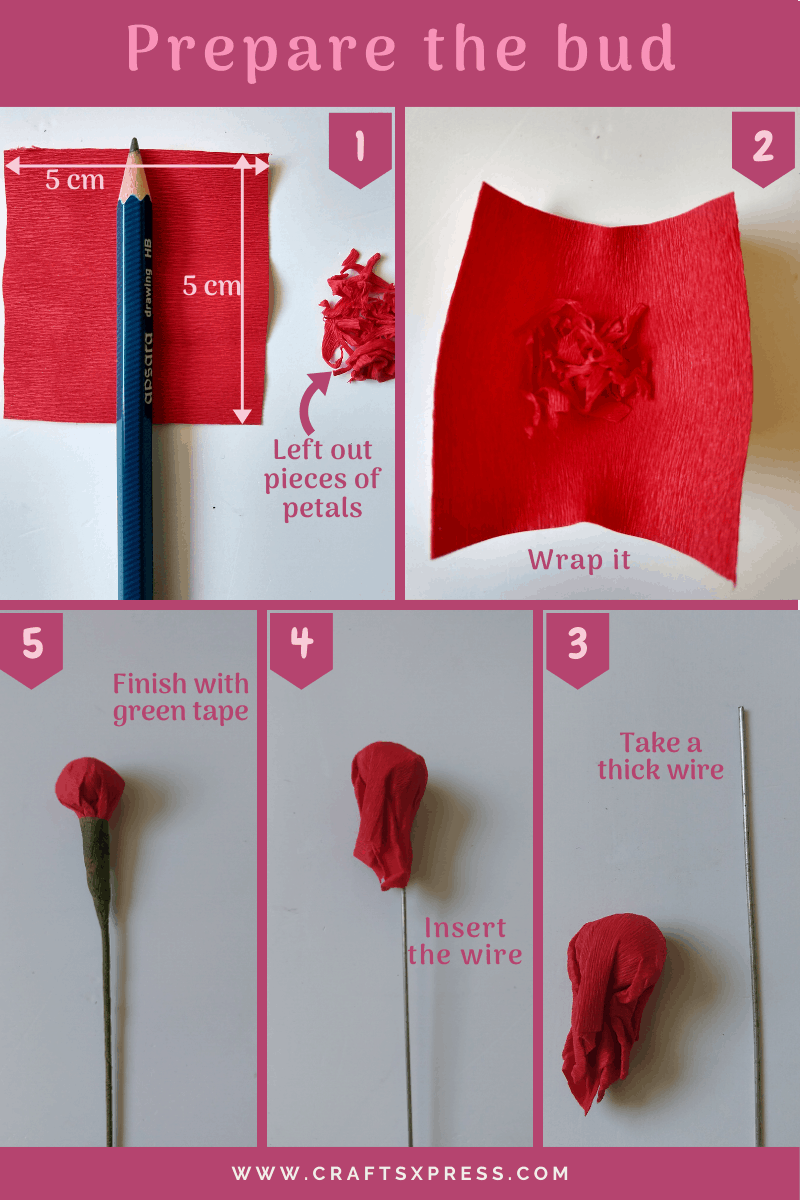
Step 3: Prepare the bud
- Measurement :Take a square piece of size 5*5 cm out of red colored crepe paper.
- Wrap: Wrap left out pieces of petals into the red colored square piece just as shown in the below image.
- Take Thick Wire: Furthermore, take a little thick wire for attaching it to the previously wrapped piece.
- Insert the wire: Next, insert the wire into the wrapped piece.
- Fix with paper tape: Fix this wire into the wrapped piece with the help of paper tape. For more reference see the above picture.
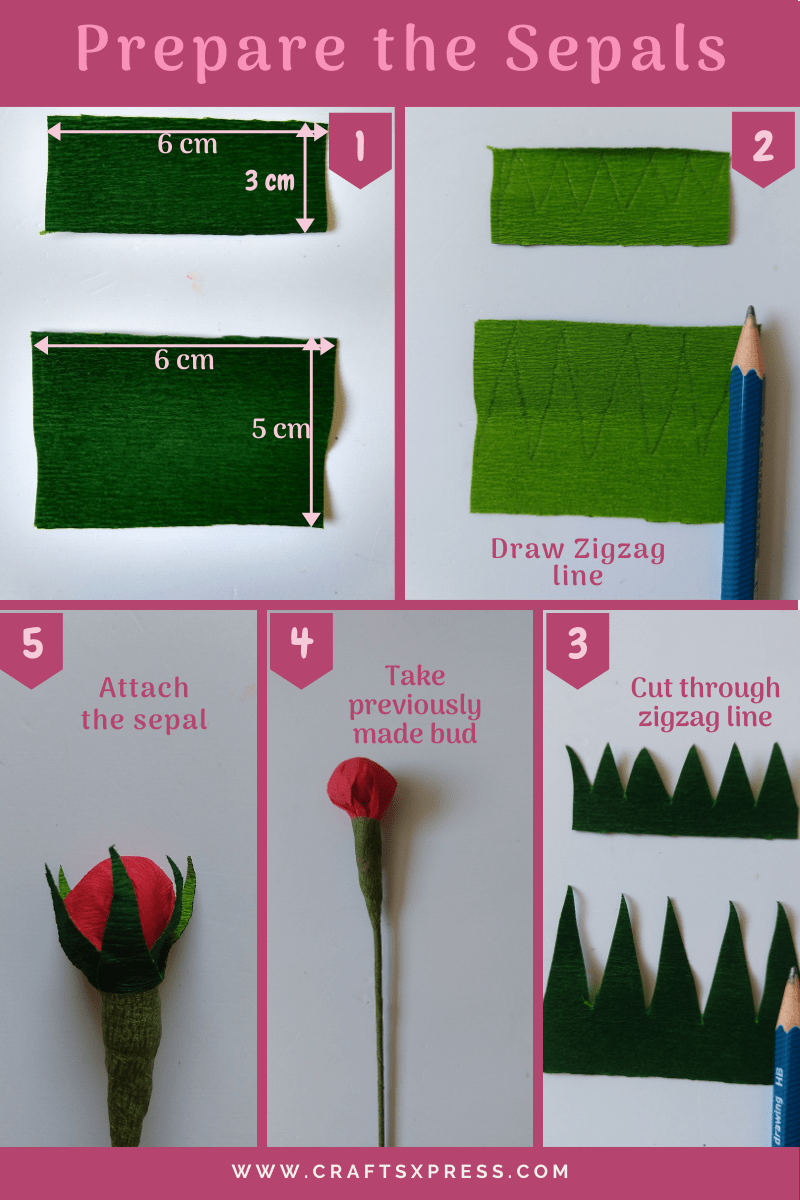
Step 4: Prepare the Sepal
- Measurement: Take a rectangular piece of size 5*5 cm out of green colored crepe paper.
- Draw Zigzag line: Further draw zigzag line on the rectangular strips with the help of pencil.
- Cut: Cut through zigzag line with the help of Scissors.
- Take the bud: Now take the previously made bud.
- Attach the Sepal: After that attach the sepal to the bud with the help of glue or glue tool. And cover the base of the sepal with the paper tape to give the bud a finished look.
Step 5: Arrange the flower
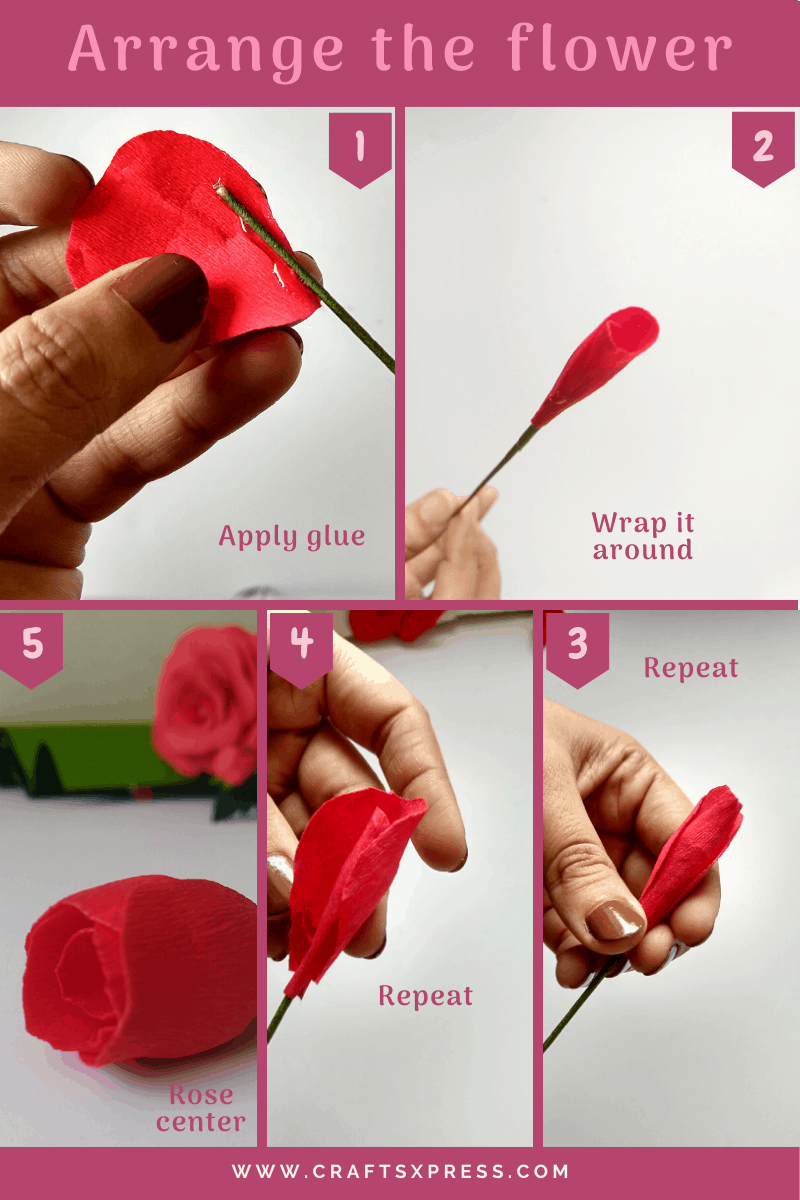
- Take petals and wire: First of all take a little thick wire and 5 small uncurled petals for rose center. Cover the wire with green paper tape.
- Rose center: Apply glue to the petal and place wire on it. Next wrap the petal around the wire.
- Repeat: Repeat the same step with rest of the four uncurled petal. As a result you will get a pretty rose center for your rose. As shown in the below image.
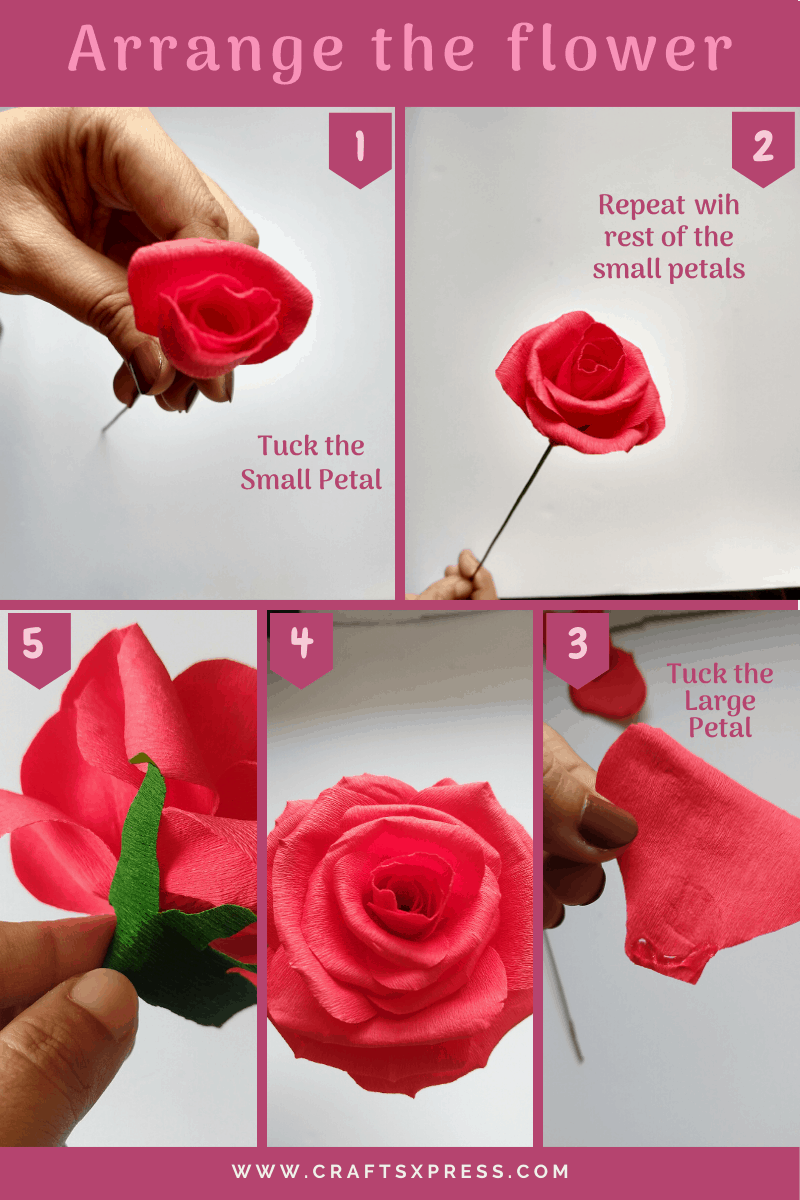
- Small curled petals: After arranging the rose center to the stem, Firstly, Arrange the small curled petals around the rose center. Repeat this task by tucking petals one by one around the rose center.
- Large petals: Secondly, arrange the large petals around the small one.
- Sepal in the last: At the last and most importantly tuck the sepal at the base of the rose. Now our beautiful paper rose is almost ready.
Step 6: Tuck the leave to the flower
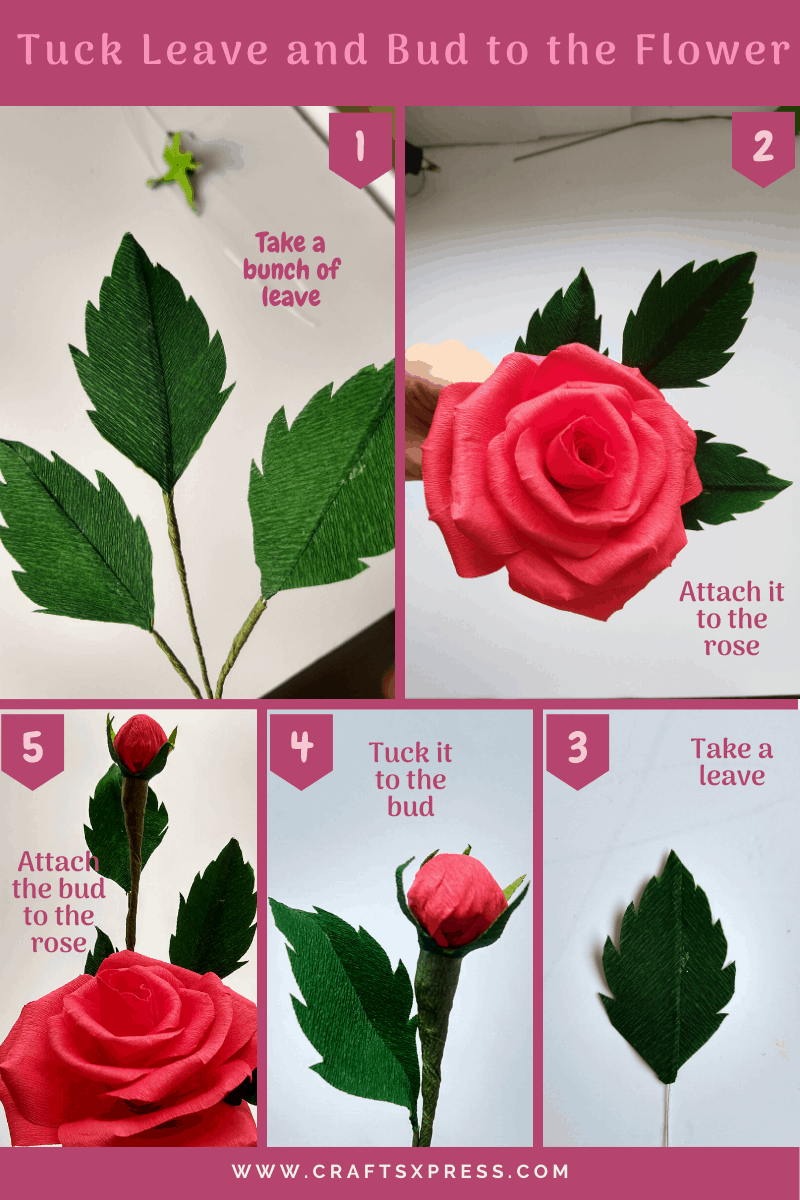
- Take a bunch of leave: Take three leaves and make a bunch out of these leaves.
- Attach to the rose: Attach this bunch to your rose.
- Take a leave: Next, Take this last leave for tucking it to the bud.
- Attach to the bud: Now attach this single leave to the bud.
- Here is your beautiful rose: Finally, attach this charming bud to your rose. Here is your beautiful real looking paper rose is ready.
I hope you connected with my technique of making a paper rose with a stem.
Crepe Paper and My Love for Making Roses
As a DIY Blogger, I always recommend beginners to use Crepe Paper for making roses. It is friendly to use and convenient. I’d like to talk a little more about it.
Crepe paper is actually a tissue paper; the difference is due to the manufacturing process. In reality crepe paper is creased tissue paper. And it is this crease that gives this paper a wonderful stretching property.
All thanks to this property, we can stretch it in can make charming flowers. This single quality of stretching makes crepe paper easy to use and imparts roses a natural look.
Hence, always go for crepe paper when it comes to making DIY roses at home.
Handy Beginner Tips for Making Paper Rose with Stem
Although making paper roses is very easy but applying the following tips you can see the difference in your roses.
| Tip 1: Prioritise Crepe Paper over other types of paper available in the market
Using crepe paper for making roses along with stems allows them to look more realistic. In fact, they look so real that you can hardly notice the difference. Reason being, we can stretch them easily and can give a realistic look to our roses. |
| Tip 2: Cut Rose Petals vertically along with wrinkles on Crepe Paper
While cutting the crepe paper, we should be more careful for making rose petals. They are to be cut vertically along with the wrinkles on crepe paper and not horizontally. |
| Tip 3: While cutting paper we should focus on the movement of our hand and wrist
During the cutting of any kind of paper you definitely want a smooth edge. For this kind of results you have to move the paper rather than hand with scissors. |
| Tip 4: Working with the paper tape stretch it slightly
Paper tape is a necessary thing which is require in the paper flower. So there is a need to completely understand its usage. It not only give a beautiful texture to the flower but also sticky which helps in tucking the petals and leaves. Stretching make it stickier. That is why we have to stretch it a little bit while working with it. |
| Tip 5: Choose the wire of proper thickness for making stem and leaves
For making stem we need a little bit hard wire which should not be so flexible. On the other hand for making leaves we need a little bit more flexible wire so that we can tuck the leaves anywhere to the stem of the flower also in the bouquet to look them more natural. |
| Tip 6: Important points while preparing the petals
It is the most skillful task in flower making, because it gives the natural beauty to the flower. Hold the upper edge of the petal in the middle of your thumb and pencil. While holding like this pull the petal a little upward. |
| Tip 7: Cut the crepe paper diagonally for the leaves
As said earlier that cut the petals vertically(see the crepe papers texture as there are wrinkles on it) |
| Tip 8: Variation in the size of the petals
There should be variation in the size of the petals while preparing them. Smallest one for innermost layer of the flowers and largest one for the outermost layer. |
| Tip 9: For a little bit larger flower
For making a little bit larger flower just increase the number of petals of each size also make some more petals which should be larger than the previously largest petals. |
| Tip 10: For dazzling leaves
Like flower, its looks dazzling if you stretch the leaves a little bit to give them a nice effect |
| Tip 11: For graceful paper rose with stem
At last, when our paper rose with stem is going to be ready, it is necessary to arrange them with one or two little buds and with a bunch of leaves. |
5 DIY Techniques for Making Paper Roses
Even though, I encourage new learners to begin making paper rose using crepe paper, there also exists around 5 other ways for making the same.
Depending on your convenience and ease of availability of material, you can go for any of them.
| 1. Small Paper Rose Using Paper Strips |
| 2. Giant Rose Using Chart Paper |
| 3. Old Book Pages Paper Rose |
| 4. Paper Roses Using Rolling Method |
| 5. Paper Roses Using Twisting Method |
Now that I’ve mentioned these 5 additional types as to how to make paper rose, let me elaborate on each one.
1. Small Paper Rose Using Paper Strips
Small paper roses using paper strips are quite simpler for beginners.
Using any types of paper strips, you can make paper roses very easily. Even you can use fabric strips, ribbon or foamiran sheet for these pretty roses.
For this you have to just fold the strips in a particular way. For a bit small rose you have to take a little wider strip of paper and for a tiny one take a narrow strip of paper.
2. Giant Rose Using Chart Paper
Giant paper roses mostly used to give a beautiful styling to the wall in decorations and in wedding for a stunning backdrop decoration. They are not only very charming but also easy to learn and make.
Using chart paper, pastel sheets or card stock, we can make giant paper roses as well as small paper roses also.
3. Old Book Pages Paper Rose
Roses from old books pages give vintage look to your flowers. They look elegant and antique also. Likewise crepe paper roses, you have to arrange them petals by petals.
Not only are they economical but also very unique look wise. They give an exclusive look to your craft.
4. Paper Roses Using Rolling Method
An extremely easy method of paper roses with chart paper or pastel sheet is rolling method. Not only the method is quit simple for beginners but also the outcome is lovely. While making paper roses using rolling method we get a beautiful rose in one go. These charming paper roses can be used in cards making whether for invitation cards or other good wishes cards.
5. Paper Roses Using Twisting Method
Paper roses using twisting method are one of the easy types of paper roses, especially for beginners. Best paper for these types of paper roses is crepe. Because crepe paper has stretching property due to crease present on is make easy to twist them and give a beautiful shape to your roses.
I hope you enjoyed that how to make a paper rose with stem. You must try your hand on this. Surely you will enjoy the outcome. If you have any query, you can easily reach to me.